By
By 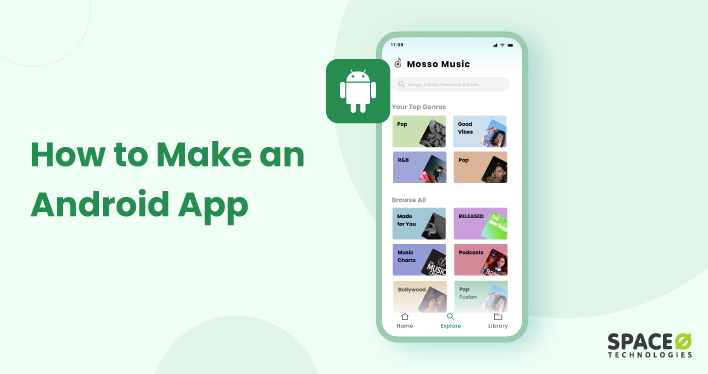
- Understand the fundamentals of Android app development, including the Android framework, user interface (UI) design, and Java or Kotlin programming language.
- Leverage the features of Android Studio, such as the layout editor, code editor, and debugging tools, to streamline the app development process and enhance productivity.
Key Takeaways
If you have decided to be an Android app developer, then you might know that, as per Built In, the average salary of an Android developer in the USA is USD 112,876. This statistic is enough to lure aspiring Android app developers to make their careers in this field.
However, just like you, often, beginners need the best guidance to start their careers. This is the reason we have crafted this comprehensive blog exclusively for you. Get to know how to build an Android app and upload it on Google Play Store in the simplest manner.
Table of Contents
- Where to Start Android App Development?
- Learning Fundamentals of Android Studio
- Build Your First Android App
- Upload Your App on Google Play Store
Where to Start Android App Development?
The first step to starting your Android app development career is to go through different courses, videos, and books. To make the selection process easy for you, we have curated some of the best resources. You can pick any of the resources which completely suit your requirements to create simple Android app.
All these resources are free of cost. Now, you can adopt one of the suitable categories or choose to go through each resource one by one.
| Type | Name | Benefits | Level |
|---|---|---|---|
| Courses | Google Developers Training |
|
Beginner |
| Coursera – Android App Development Specialization |
|
Beginner | |
| Udacity – Developing Android Apps |
|
Intermediate | |
| YouTube Channels | Android Developers |
|
Beginner |
| CodingWithMitch |
|
Beginner | |
| Books | Android Programming: The Big Nerd Ranch Guide |
|
Intermediate |
| Head First Android Development: A Brain-Friendly Guide |
|
Beginner | |
| Android Application Development All-in-one for Dummies |
|
Beginner |
If you want to learn Android development, you must ensure that you know the ins and outs of Android Studio as well as know the future of mobile apps. Understanding the futuristic technologies will help you to maximize your reach. Need quick guidance and tips on how to code an app for android? Read the next section.
Have an App Idea But Unsure Where to Start?
Partner with Space-O Technologies—your start-to-end Android development partner. Get expert assistance to design, build, and launch a successful Android app.

Learning Fundamentals of Android Studio
Android Studio is the official Integrated Development Environment (IDE) to build Android apps. This helps developers to build Android applications on the mobile OS.
Pros of Android Studio (Integrated Development Environment)
- It has an easy-to-read user interface with a code editor
- It has a preview section to see changes
- Has plenty of templates and sample apps
- Fast and feature-rich emulator
- Offers testing tools and frameworks
You can download Android Studio for free and start building Android apps. Check how to build Android application tutorial to know the complete app development procedure.
If you’re looking for professional help, checkout top Android app development companies can assist in creating high-quality, customized Android applications. They bring expert knowledge, resources, and streamlined processes to ensure your app is scalable, secure, and optimized for performance.
Tips and Tricks to Use Android Studio Fast
| Task | For MacOSX (Press) | For Windows/Linux(Press) |
|---|---|---|
| To Search Enumerations, Classes, and Interfaces | ⌘ + O | Ctrl + N |
| To Search Files | ⌘ + ⇧ + O | Shift + Ctrl + N |
| To Search Symbols | ⌘ + ⌥ + O | Shift + Ctrl + Alt + N |
| To Delete Code | ⌘ + Backspace | Ctrl + Y |
| To Duplicate Code | ⌘ + D | Ctrl + D |
| To Extract Methods | ⌥ + ⌘ + M | Ctrl + Alt + M |
| To Extract Method Parameters | ⌥ + ⌘ + P | Ctrl + Alt + P |
Understanding Android Studio will add a great advantage to building apps. So, let’s check out the steps to develop an Android app using Android Studio.
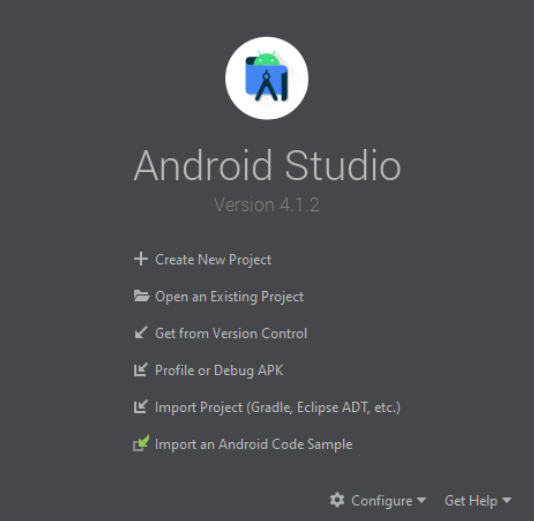
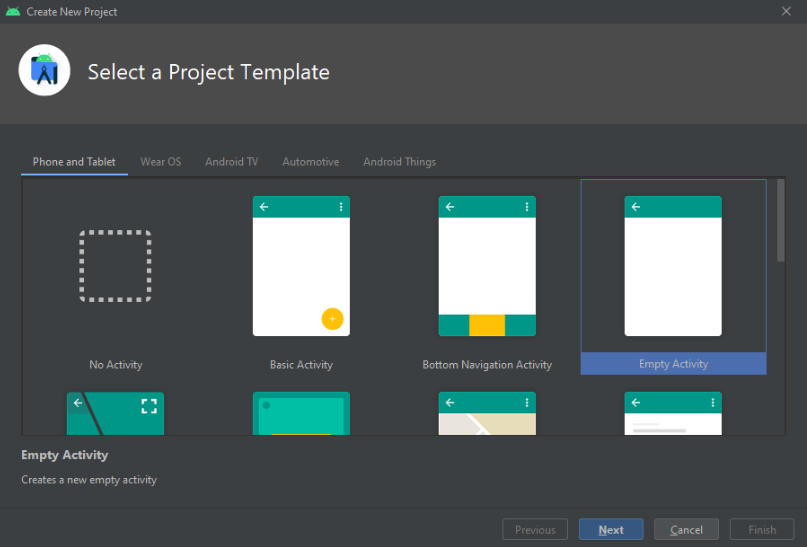
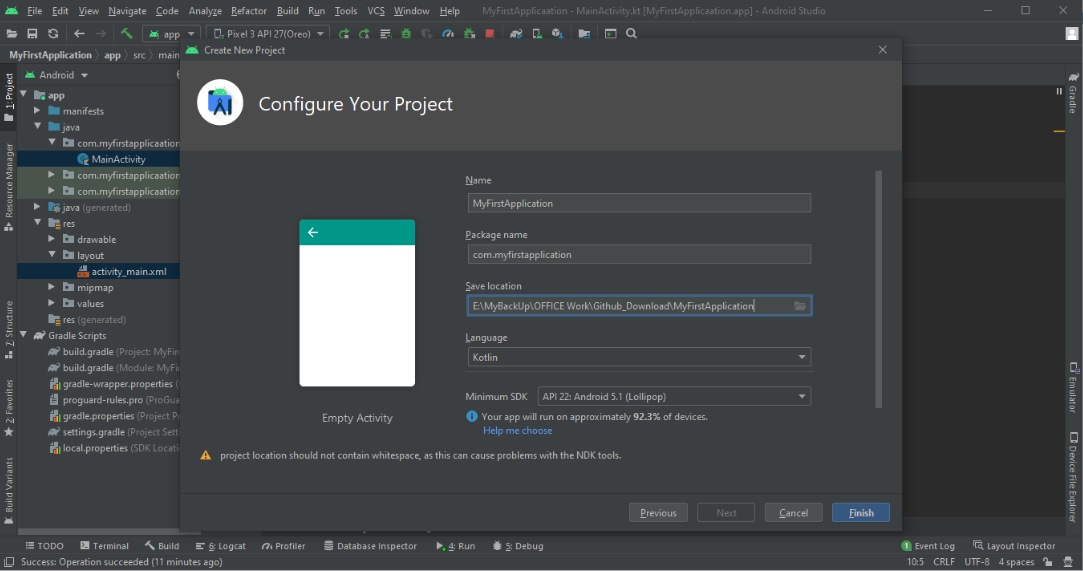
Build Your First Android App
If you still have questions such as how to create apps for Android, or how to make an app with Android Studio, then read ahead. We have shared 8 steps to building an Android app that displays the message ‘Your first application is created when you click on the ‘CLICK ME’ button. Please go through all the steps one by one.
-
Create New Project
- Click on ‘Create New Project’
-
Select Empty Activity
- Select ‘Empty Activity’
- Click ‘Next’
-
Configure Your Project
- Enter “MyFirstApplication” in the ‘Name’ field
- Enter “com.myfirstapplication” in the ‘Package name’ field
- Enter the ‘Save location’
- Select either Java or Kotlin from the ‘Language’ drop-down menu (Recommended to select ‘Kotlin’)
- Select the lowest version of Android that your app can support in the ‘Minimum SDK’ field
- Now, click ‘Finish’
-
Add Button to XML File in Split Window
- Steps to open “activity_main.xml” File
- Click on “app ”(display in left side windows)
- Click on “res”
- Click on “layout” file
- Click on “activity_main.xml” file
- Add below code in xml file between
tag - Steps to open strings.xml file
- Click on “app”
- Click on “res” folder
- Click on “values”
- “Add below code in string file between
tag” -
Enable viewBinding in build.gradle(app) file
- Steps to open build.gradle file
- Click on “Gradle Scripts”(displayed in left side windows)
- Click on “build.gradle” file (second file under Gradle Scripts)
- Add the below code in build.gradle file for enable “viewBinding ”
- Click on “Sync Now” text (displayed in right side corner on screen)
-
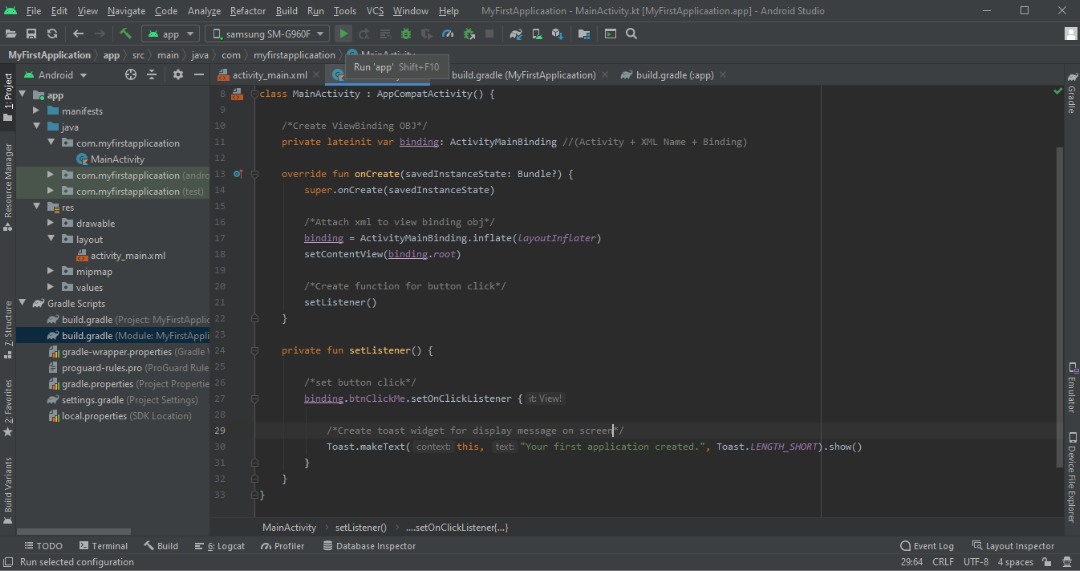
Code for Displaying Message
- Steps to open MainActivity.kt file
- Click on “app”
- Click on “java”
- Click on “com.myfirstapplication”
- Click on “MainActivity” file
- Here comes the coding part of building your first Android app.
-
Click on Run Button
-
Run App in Emulator
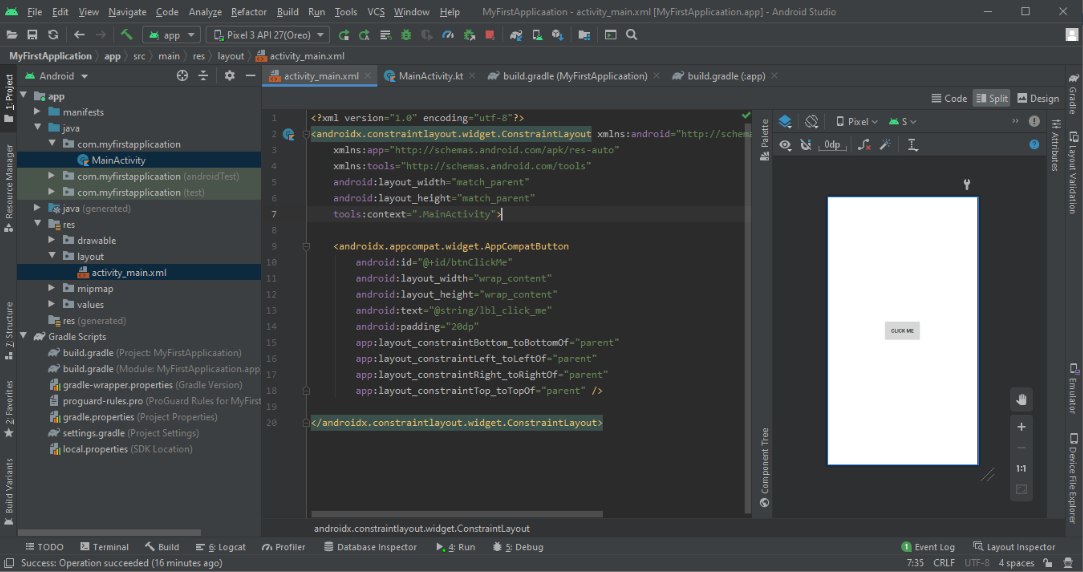
<androidx.appcompat.widget.AppCompatButton
    android:id="@+id/btnClickMe"
    android:layout_width="wrap_content"
    android:layout_height="wrap_content"
    android:text="@string/lbl_click_me"
    android:padding="20dp"
    app:layout_constraintBottom_toBottomOf="parent"
    app:layout_constraintLeft_toLeftOf="parent"
    app:layout_constraintRight_toRightOf="parent"
    app:layout_constraintTop_toTopOf="parent" />
Click on the “strings.xml” file
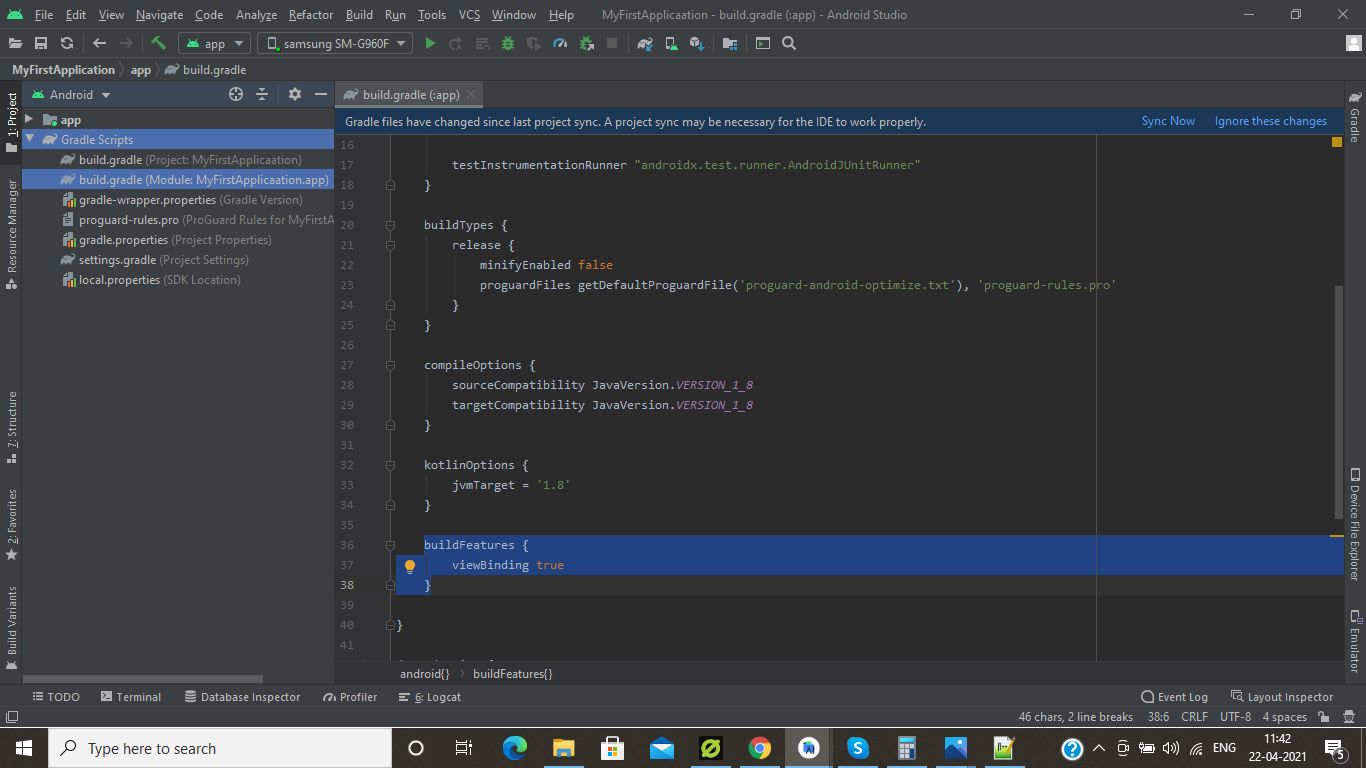
buildFeatures {
    viewBinding true
}

Step 1:
/* Create ViewBinding OBJ */
private lateinit var binding: ActivityMainBinding // (Activity + XML Name + Binding)
Step 2:
/* Attach xml to view binding obj in onCreate function */
    binding = ActivityMainBinding.inflate(layoutInflater)
    setContentView(binding.root)
Step 3:
/* Create function for button click and call in onCreate function after setContentView */
    private fun setListener() {
    /*set button click*/
    binding.btnClickMe.setOnClickListener {
    /* Create toast widget for display message on screen */
    Toast.makeText(this, “Your first application is created.”, Toast.LENGTH_LONG).show()
    }
}
Step 4:
/* Run application */
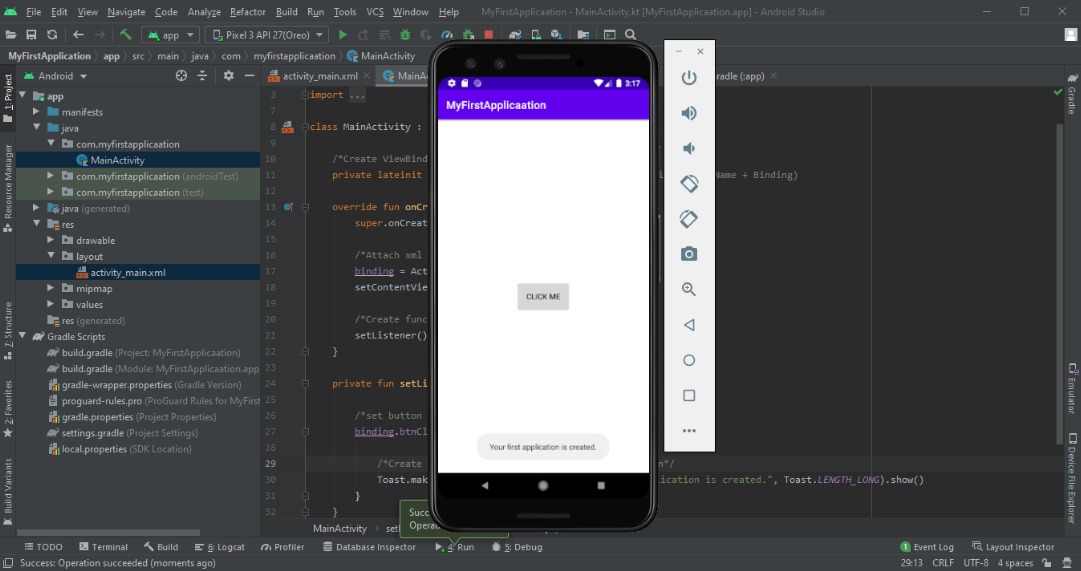
You have successfully developed your first app.
So, after learning the process of developing an Android app if you are curious about the cost of making different types of Android apps then we have a useful resource for you.
Download the PDF below to find out how much it costs to develop Android apps for different categories.

After developing your first Android app successfully, you must learn how to upload it on Google Play Store. Right? Refer to our next section.
Upload Your App on Google Play Store
Thousands of Android apps get released every month via the Play Store. There are numerous benefits associated with publishing apps to app stores. It gives a boost to your featured app with the number of downloads, wide target audience/users reach, and ultimately leads to great profit.
So, let’s check all the steps to upload an Android app on Play Store. Just ensure you follow each step in chronological order to avoid errors.
-
Google Play Developer Console
Android developers submit an app to the Play Store through Developer Console, which is a kind of a backend controlling center. You will need to pay a one-time fee of $25 to open an account loaded with functions and control features.
Additionally, you will be required to fill in all the information, such as your name and country details. It might take up to 48 hours to approve your account. After that, you can publish your Android app to the Play Store for free.
-
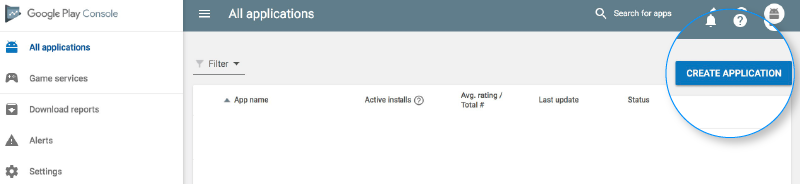
Create Application
Here are your next action points:

- Go to the ‘All applications’ tab
- Select ‘Create Application’
- Set default language from the drop-down menu
- Enter the title of your application
- Now click on ‘Create’
-
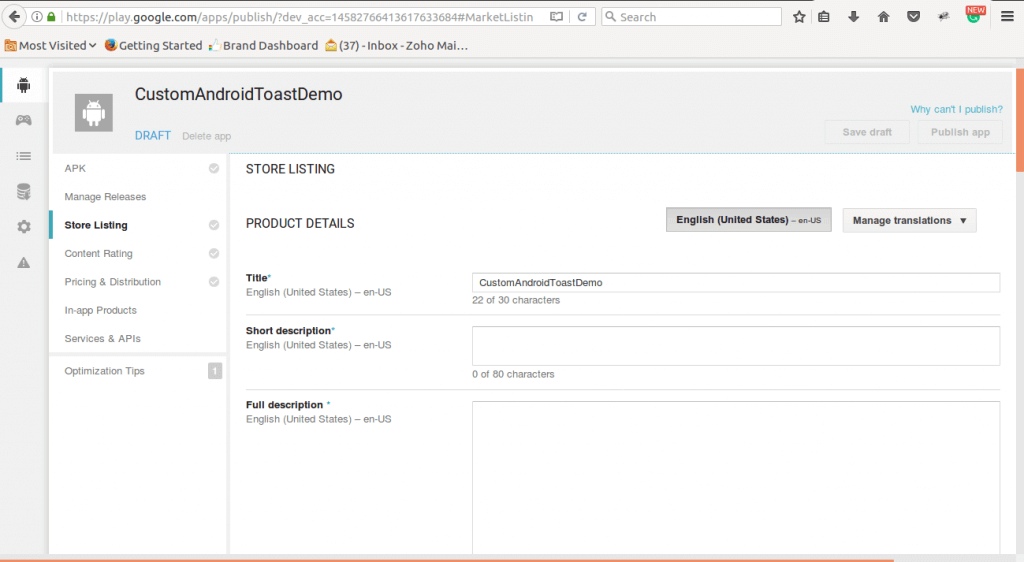
Store Listing
As shown in the image, you will be required to fill in all the information and details about the app. Just ensure you use appropriate keywords related to your app because this will increase the chances for your app to show up in searches.

Here are the best practices that you need to consider while publishing your app-
- Title
- Short description
- Full description
- Screenshots of your app (JPEG or 24-bit PNG) (Min – 320px & Max – 3840px)
- Hi-resolution icon (512 x 512) ((with alpha) 32-bit PNG)
- Feature Graphic (1024 w x 500 h) (JPG or 24-bit PNG (no alpha))
- Type of application
- Category of your app
- Rating of the content
- Email of app developer or company
- URL for the privacy policy
- Use 2 – 8 images
-
Upload App Bundles or APK To Play Store
In this step, you will be required to use the files, such as App bundle or APK and sign the app release and upload them into your application. You can also refer to this blog on how to generate a signed APK.
- Click on the ‘App Releases’ tab
- Choose any one release 1) Internal Test, 2) Close Test, 3) Production Release, 4) Open Test
- Select ‘Create Release’
- Land on the New release to the production page
- Choose to opt for the Play Store app signing on the app
- Click on the ‘OPT-OUT’ option
- Select ‘Browse files’ and upload apk to Play Store
- Click on ‘Review’ to confirm the information
- Press ‘Save’
-
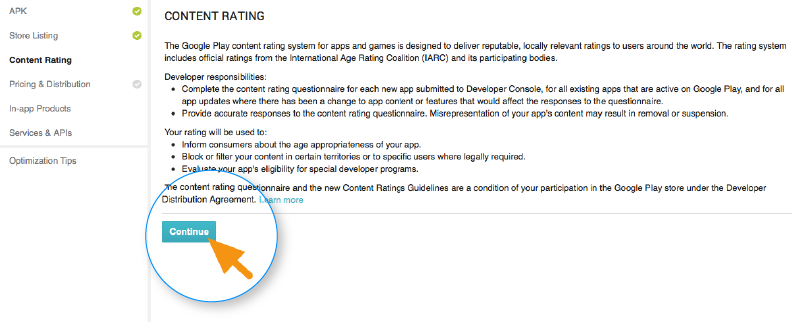
Time for Content Rating
It is essential to rate the app. Otherwise, the app listed as ‘Unrated’ might get removed from the store.

- Select ‘Content Rating’
- Click on ‘Continue’ and type your email address
- Press ‘Confirm’
- Fill in the questionnaire for your app rating
- Select the ‘Save Questionnaire’
- Choose the ‘Calculate Rating’ option to see the app rating
- Click on ‘Apply’
-
Fix App Pricing and Distribution
Please ensure that Google doesn’t allow anyone to convert free apps to paid apps. However, you can change the price of the app later. So, assign a price for your app wisely.
- Go to the Pricing and Distribution tab
- Choose ‘PAID’ or ‘FREE’
- Select the countries where you want to publish your app
- Select ‘Yes’ for Primary Child-Detected (app suited for children under the age of 13) or ‘No’
- Select the options for allowing any ads
-
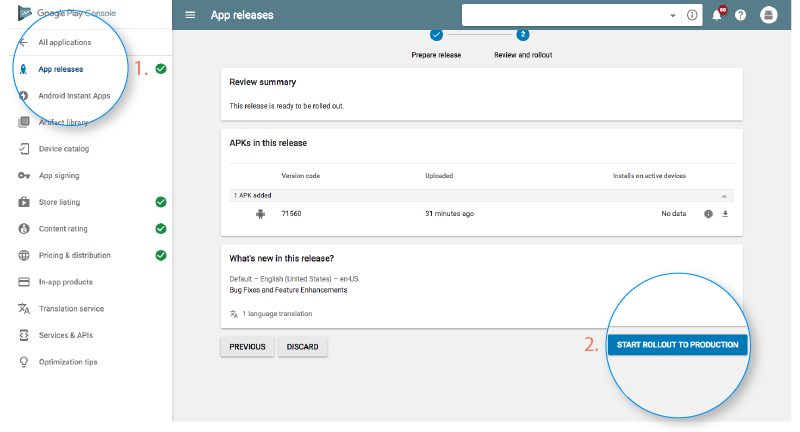
Publish Your App

- Go to the ‘App Releases’ tab
- Select ‘Manage Production’ and ‘Edit Release’
- Click on ‘Review’
- Choose ‘Start rollout to production’
- Select ‘Confirm’
Confirming this means you have successfully published your app to the Play Store. Now, you have to wait for your app to get approval. Generally, it takes around 2 hours but can also take days for the same.
Ready to Bring Your Android App Idea to Life?
Win over the Android market with our expertise in Android app development. From concept to launch, we’re here to guide you at every step.
If you still have queries such as how to create an Android application, or which programming languages are the best for Android development, then read the FAQ section.
Frequently Asked Questions
What is the estimated cost to build an Android mobile app?
The estimated cost to create an Android app ranges from $10,000 to $1,00,000. This range depends on various factors, such as:
- Features and functionalities
- Type of the app
- App complexity
- App design
- Location of the developers
Which programming language is the best to build Android apps?
- Java
- Kotlin
What to do after submitting an app to the app store?
- Promote an app on social media
- Maintain app and its updates
- Practice ASO (App Store Optimization)
Conclusion
We have discussed how you can start your career in mobile development for creating apps. Additionally, we have shown steps to build an Android app and publish it on Play Store, along with the screenshots. We hope this information will help you reach your goal and to understand how to make an android application.
Whether you are an entrepreneur or an aspiring Android developer, if you face any challenge to build your first Android app or need any guidance from experts, contact our team of professional Android app developers. Our developers have experience in developing over 1600 Android apps.
You can also go through the portfolio section to check the different apps that our experts successfully develop. One8, the transportation management app, and EasyClean, an on-demand laundry app, are some of the best apps created by our Android developers.
To get the best Android application development services, you can contact Android experts through Contact Us form. Don’t miss the opportunity to get a free consultation.