By
By 
Through this Stripe payment gateway integration in the Android guide, you will learn how to integrate stripe payment gateway into Android application. By the end of this Stripe Android tutorial post, you will get the answer of how to integrate stripe payment gateway in the Android application and able to accept payments from your Android app. Excited? Let’s get going.
Table of Contents
If you are developing a mobile app for your business, then you have to somehow accept payments in your application. Whether it’s a travel app or eCommerce mobile app, you will have to provide an option for customers to pay for the goods or services that your app offers.
To make it happen, various mobile payment gateways are generally being used. Now, there are a large number of payment gateways available in the market which allow you to process credit card transaction data through their APIs. But, by integrating one such payment gateway also puts the responsibility of the security of credit card data on your shoulders as that credit card data will be passing through your mobile app.
Generally, when a mobile payment gateway is implemented in your app, the API should hand back a token from your server’s secure authenticated environment. This token represents the submitted card and is used for the actual transaction.
Now, if you want to integrate a payment gateway to create commission-based transactions, there are only a few options available. And among these few options, Stripe is the best.
Stripe payment gateways allow both, individuals and businesses to accept payments over mobile apps. Stripe was basically launched in 2011 and now supports 100+ currencies, becoming one of the most popular payment gateways in the world.
In fact, you can learn more about Stripe payments, explained by one of our Senior Android developers sharing his experience of using Stripe as a payment gateway in one of the Android applications.
Now, if you’re an Android developer and looking forward to learning how to Integrate Stripe payment gateway in an Android Application, the below guide will help you how to do it right.
Stripe Payment Gateway Integration with Commission Based Transaction
We integrate a stripe payment gateway in Android and along with that, our client wants us to get a commission on every transaction and needs to connect to the user’s account for the commission.
We provide a commission-based solution that allows our clients to earn some amount for every transaction.
Are you ready to discover the stripe payment gateway integration in android example? Let us guide you step by step to complete the entire integration process.
![]() For the developer: Add below two dependencies in the Gradle file of your project.
For the developer: Add below two dependencies in the Gradle file of your project.
compile 'com.stripe:stripe-java:1.47.0'
compile 'com.stripe:stripe-android:1.0.4'
![]() To get the commission, you need to connect with a user account and for that, you need to get an authorization code.
To get the commission, you need to connect with a user account and for that, you need to get an authorization code.
To authorize this code you need to have a client id which you will get through register your application on stripe.
This is just a one-time process for obtaining the client id. This will give you access to Stripe Connect settings.
Use this link to get register your application with Stripe and begin developing with Stripe Connect.
Here we are showing how you can register your platform (Platform means your application) after. Login into the stripe and register the platform.
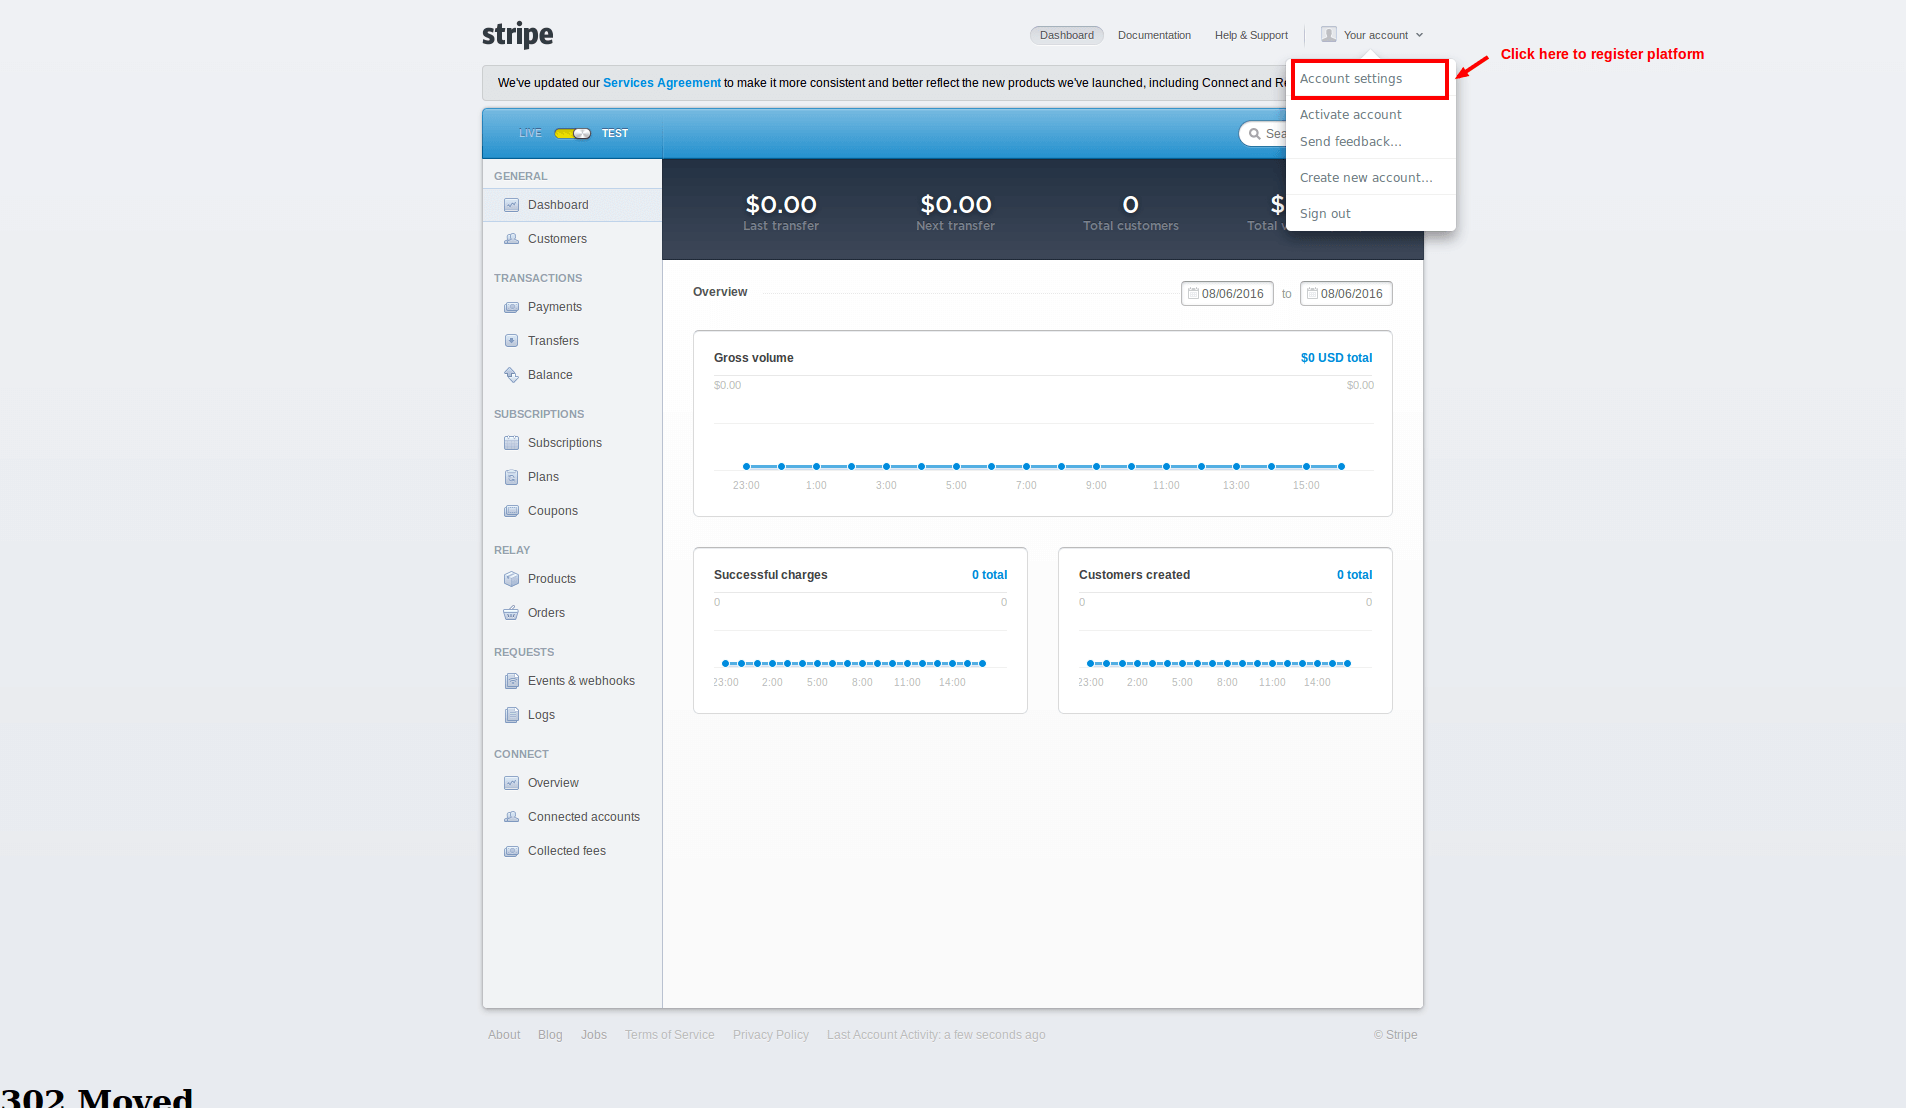
![]() Click on Your Account which will be on the top right corner of your dashboard. See the below screenshot.
Click on Your Account which will be on the top right corner of your dashboard. See the below screenshot.
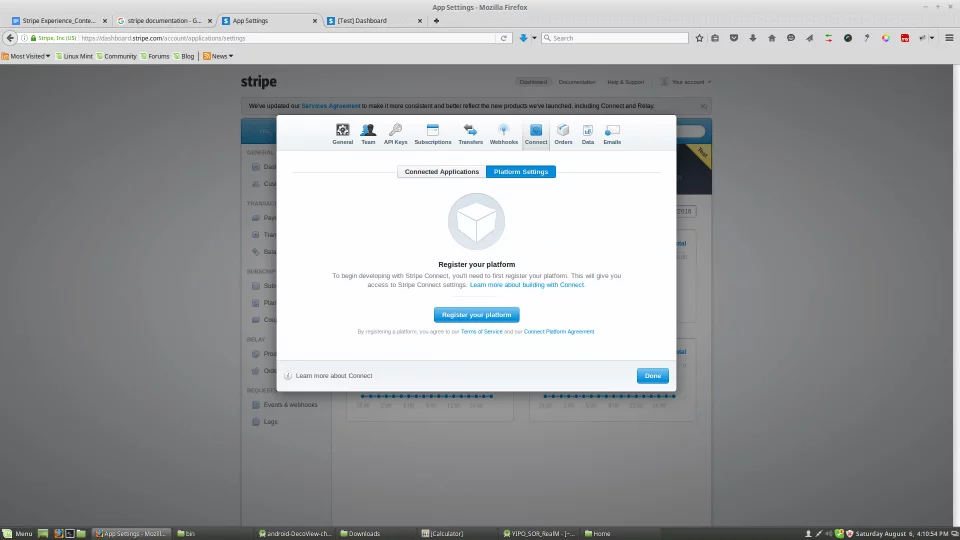
![]() Now the window will be a pop up to register your platform. Click on connect and you will have a screen to register your platform. See the below screenshot for more info.
Now the window will be a pop up to register your platform. Click on connect and you will have a screen to register your platform. See the below screenshot for more info.
![]() Click on the register your platform button then you will have one more window which moves to your final destination to register the platform. Just fill up all the information and press on the Done button.
Click on the register your platform button then you will have one more window which moves to your final destination to register the platform. Just fill up all the information and press on the Done button.
[Developer note we experienced: You need to enter website url and redirect urls with having https:// format. See below screenshot.]
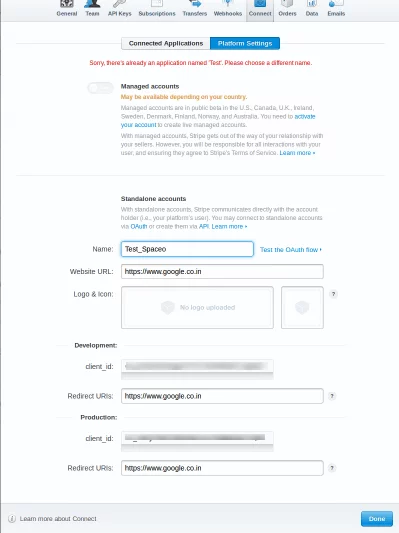
By filling in all the above-mentioned information, you will have a client id that will be used to authorize your account.
Step 3) A process to get Stripe authentication code (OAuth 2.0) through client ID
To connect with the user’s account – the user needs to go through OAuth2.0 for a managed account. This whole authentication process is managed by Stripe. Replace Client ID text in the below URL and open it in the browser.
https://connect.stripe.com/oauth/authorize?response_type=code&client_id=YOUR_CLIENTID&scope=read_write
For Test and Live modes of Development, you will get different client ids, so take care of client id passing with the above URL.
Here are the micros steps to get the authorization code:
3.1) After logging, a user is redirected to the URL set, which is Step 1.
http://www.yourredirectionurl.com/?scope=read_write&code=AUTHORIZATION_CODE
Here, we get “AUTHORIZATION_CODE”.
3.2) This AUTHORIZATION_CODE needs to pass through the curl which returns the “stripe_user_id”
curl https://connect.stripe.com/oauth/token \
-d client_secret=CLIENT_SECRET_KEY \
-d code=AUTHORIZATION_CODE \
-d grant_type=authorization_code
In the step 3.2) you may have question that what is the CLIENT_SECRET_KEY.
And how do you get it?
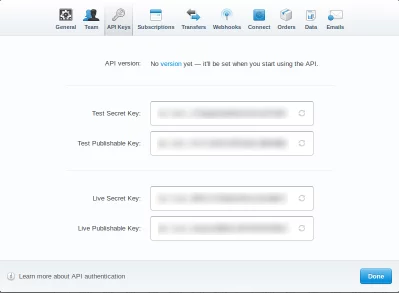
This is the key to that client who needs to get some amount of every transaction into his account. To get SECRET_KEY click on API_KEYS which appears at the third position of the below screenshot. And use Test Secret Key from that all listing keys.
3.3) You need to save this stripe_user_id and pass this stripe_user_id to get a commission. You just need to take of test and live modes of development and make sure you change the secret key and client id.
Based on our client’s requirement, we would like you to share the XML file for obtaining details of the credit card number, Expiry Date, CVV number, Amount of Transaction, Description of Transaction and Email of Receipt.
![]() XML File Code
XML File Code
<RelativeLayout xmlns:android="http://schemas.android.com/apk/res/android" android:id="@+id/LinearLayout1" android:layout_width="match_parent" android:layout_height="match_parent" android:background="@drawable/gredientbg" android:orientation="vertical"> <ScrollView android:layout_width="match_parent" android:layout_height="wrap_content"> <LinearLayout android:layout_width="match_parent" android:layout_height="wrap_content" android:orientation="vertical"> <LinearLayout android:id="@+id/llTop" android:layout_width="match_parent" android:layout_height="wrap_content" android:orientation="vertical"> <ImageView android:id="@+id/imgLogo" android:layout_width="match_parent" android:layout_height="wrap_content" android:layout_marginTop="30dp" android:src="@drawable/logo" /> <com.paynow.utils.MyTextView android:id="@+id/textTitle" android:layout_width="wrap_content" android:layout_height="wrap_content" android:layout_gravity="center_horizontal" android:layout_marginTop="@dimen/scal_10dp" android:text="@string/text_charge_card_title" android:textColor="@color/color_white" android:textSize="@dimen/scal_16sp" /> </LinearLayout> <LinearLayout android:layout_width="match_parent" android:layout_height="wrap_content" android:orientation="vertical"> <FrameLayout android:layout_width="match_parent" android:layout_height="wrap_content" android:layout_marginLeft="@dimen/scal_20dp" android:layout_marginTop="@dimen/scal_20dp" android:layout_marginRight="@dimen/scal_20dp"> <com.paynow.utils.MyEditText android:id="@+id/editAmount" android:layout_width="match_parent" android:layout_height="wrap_content" android:layout_marginTop="@dimen/scal_10dp" android:background="@color/color_white" android:hint="@string/edit_amount_hint" android:imeOptions="actionNext" android:inputType="numberDecimal" android:maxLength="15" android:paddingLeft="@dimen/scal_70dp" android:paddingTop="@dimen/scal_10dp" android:paddingRight="@dimen/scal_10dp" android:paddingBottom="@dimen/scal_10dp" android:singleLine="true" android:text="0.00" android:textAllCaps="false" /> <Spinner android:id="@+id/spinnerCurrency" android:layout_width="@dimen/scal_70dp" android:layout_height="@dimen/scal_40dp" android:layout_marginTop="@dimen/scal_10dp" android:background="@drawable/dropdown_selector" android:drawSelectorOnTop="true" android:paddingTop="5dp" android:paddingRight="10dp" android:paddingBottom="0dp" android:prompt="@string/currency_prompt" android:textColor="@color/color_currency" android:textSize="18sp" /> </FrameLayout> <FrameLayout android:layout_width="match_parent" android:layout_height="wrap_content" android:layout_gravity="center_vertical" android:layout_marginLeft="20dp" android:layout_marginTop="10dp" android:layout_marginRight="20dp"> <LinearLayout android:layout_width="match_parent" android:layout_height="wrap_content" android:orientation="vertical"> <com.paynow.utils.MyEditText android:id="@+id/editCardNumber" android:layout_width="match_parent" android:layout_height="wrap_content" android:background="@color/color_white" android:drawableLeft="@drawable/icon_card" android:drawablePadding="@dimen/scal_15dp" android:hint="@string/edit_cardnumber_hint" android:imeOptions="actionNext" android:inputType="phone" android:maxLength="25" android:paddingLeft="@dimen/scal_10dp" android:paddingTop="@dimen/scal_10dp" android:paddingRight="80dp" android:paddingBottom="@dimen/scal_10dp" android:singleLine="true" android:textAllCaps="false" /> </LinearLayout> <ImageView android:id="@+id/ivCamera" android:layout_width="wrap_content" android:layout_height="wrap_content" android:layout_gravity="right|center_vertical" android:layout_marginRight="@dimen/scal_10dp" android:src="@drawable/camera_icon" /> <ImageView android:id="@+id/ivWireless" android:layout_width="wrap_content" android:layout_height="wrap_content" android:layout_gravity="right|center_vertical" android:layout_marginRight="45dp" android:src="@drawable/pay_icon" /> </FrameLayout> <LinearLayout android:layout_width="match_parent" android:layout_height="wrap_content" android:layout_marginLeft="20dp" android:layout_marginTop="10dp" android:layout_marginRight="20dp" android:orientation="vertical"> <com.paynow.utils.MyEditText android:id="@+id/editEpiryDate" android:layout_width="match_parent" android:layout_height="wrap_content" android:background="@color/color_white" android:digits="@string/text_char_set_exp_date" android:drawableLeft="@drawable/icon_calender" android:drawablePadding="@dimen/scal_15dp" android:hint="@string/edit_expirydate_hint" android:imeOptions="actionNext" android:inputType="number" android:maxLength="10" android:padding="@dimen/scal_10dp" android:singleLine="true" android:textAllCaps="false" /> </LinearLayout> <LinearLayout android:layout_width="match_parent" android:layout_height="wrap_content" android:layout_marginLeft="20dp" android:layout_marginRight="20dp" android:layout_marginTop="@dimen/scal_10dp" android:orientation="vertical"> <com.paynow.utils.MyEditText android:id="@+id/editCvcNumber" android:layout_width="match_parent" android:layout_height="wrap_content" android:background="@color/color_white" android:digits="@string/text_char_set_numeric" android:drawableLeft="@drawable/icon_lock" android:drawablePadding="@dimen/scal_15dp" android:hint="@string/edit_cvc_hint" android:imeOptions="actionNext" android:inputType="number" android:maxLength="4" android:padding="@dimen/scal_10dp" android:singleLine="true" android:textAllCaps="false" /> </LinearLayout> <LinearLayout android:layout_width="match_parent" android:layout_height="wrap_content" android:layout_marginLeft="20dp" android:layout_marginRight="20dp" android:layout_marginTop="@dimen/scal_10dp" android:orientation="vertical"> <com.paynow.utils.MyEditText android:id="@+id/editRefDesc" android:layout_width="match_parent" android:layout_height="wrap_content" android:background="@color/color_white" android:drawableLeft="@drawable/icon_pencil" android:drawablePadding="@dimen/scal_15dp" android:hint="@string/edit_ref_desc_hint" android:imeOptions="actionNext" android:inputType="text" android:maxLength="50" android:padding="@dimen/scal_10dp" android:singleLine="true" android:textAllCaps="false" /> </LinearLayout> <LinearLayout android:layout_width="match_parent" android:layout_height="wrap_content" android:layout_marginLeft="@dimen/scal_20dp" android:layout_marginRight="@dimen/scal_20dp" android:layout_marginTop="@dimen/scal_10dp" android:orientation="vertical"> <com.paynow.utils.MyEditText android:id="@+id/editEmail" android:layout_width="match_parent" android:layout_height="wrap_content" android:background="@color/color_white" android:drawableLeft="@drawable/icon_email" android:drawablePadding="@dimen/scal_15dp" android:ems="10" android:hint="@string/edit_email_hint" android:imeOptions="actionDone" android:inputType="textEmailAddress" android:maxLength="50" android:padding="@dimen/scal_10dp" android:singleLine="true" android:textAllCaps="false" /> </LinearLayout> <Button android:id="@+id/btnChargeCard" android:layout_width="match_parent" android:layout_height="wrap_content" android:layout_marginBottom="@dimen/scal_20dp" android:layout_marginLeft="20dp" android:layout_marginRight="20dp" android:layout_marginTop="20dp" android:background="@drawable/blank_botton" android:gravity="center" android:paddingBottom="@dimen/scal_5dp" android:text="@string/btn_charge_card" android:textAllCaps="false" android:textColor="@color/button_text_color" android:textSize="@dimen/button_text_size" /> <RelativeLayout android:id="@+id/rlBottom" android:layout_width="match_parent" android:layout_height="wrap_content" android:layout_alignParentBottom="true" android:background="#04BECB" android:padding="@dimen/scal_18dp"/> <TextView android:layout_width="wrap_content" android:layout_height="wrap_content" android:layout_centerVertical="true" android:layout_marginRight="@dimen/scal_20dp" android:layout_toLeftOf="@+id/switchLive" android:text="LIVE" android:textColor="@color/color_white" android:textSize="@dimen/txt_17" /> <android.support.v7.widget.SwitchCompat android:id="@+id/switchLive" android:layout_width="wrap_content" android:layout_height="wrap_content" android:layout_centerInParent="true" android:checked="true" /> <TextView android:layout_width="wrap_content" android:layout_height="wrap_content" android:layout_centerVertical="true" android:layout_marginLeft="@dimen/scal_20dp" android:layout_toRightOf="@+id/switchLive" android:text="TEST" android:textColor="@color/color_white" android:textSize="@dimen/txt_17" /> </RelativeLayout> </LinearLayout> </LinearLayout> </ScrollView> </RelativeLayout>
Want To Integrate Stripe Payment Gateway In Android Application?
Validate your app idea and get a free quote.

![]() With the above XML, you will get the above-mentioned details, but if you want to scan the credit card, you should follow the below method for your Java class file.
With the above XML, you will get the above-mentioned details, but if you want to scan the credit card, you should follow the below method for your Java class file.
private void scanCard() {
if (CardIOActivity.canReadCardWithCamera()) {
        onScanPress();
        isCardIo = true;
    } else {
        myUtility.setAlertMessage(getString(R.string.app_name), "Enter credit card information manual.");
    }
}
public void onScanPress() {
    Intent scanIntent = new Intent(this, CardIOActivity.class);

    // customize these values to suit your needs.
    scanIntent.putExtra(CardIOActivity.EXTRA_SCAN_EXPIRY, true);
    scanIntent.putExtra(CardIOActivity.EXTRA_REQUIRE_EXPIRY, true);
    scanIntent.putExtra(CardIOActivity.EXTRA_REQUIRE_CVV, false);
    scanIntent.putExtra(CardIOActivity.EXTRA_REQUIRE_POSTAL_CODE, false);
    scanIntent.putExtra(CardIOActivity.EXTRA_USE_CARDIO_LOGO, false);
    scanIntent.putExtra(CardIOActivity.EXTRA_HIDE_CARDIO_LOGO, true);
    scanIntent.putExtra(CardIOActivity.EXTRA_USE_PAYPAL_ACTIONBAR_ICON, false);
    scanIntent.putExtra(CardIOActivity.EXTRA_GUIDE_COLOR, Color.parseColor("#33b5e5"));
    // hides the manual entry button
    // if set, developers should provide their own manual entry mechanism in the app
    scanIntent.putExtra(CardIOActivity.EXTRA_SUPPRESS_MANUAL_ENTRY, true);
    startActivityForResult(scanIntent, MY_SCAN_REQUEST_CODE);
}
![]() To validate the credit card – use the below mentioned method in your Java class file.
To validate the credit card – use the below mentioned method in your Java class file.
private boolean isCardValid() {
    String cardNumber = editCardNumber.getText().toString().replace(" ", "");
    String cardCVC = editCvcNumber.getText().toString();
    String[] expiryDateTokens = editEpiryDate.getText().toString(). split("/");
    int cardExpMonth = Integer.parseInt(expiryDateTokens[0]);
    int cardExpYear = Integer.parseInt(expiryDateTokens[1]);

    // Card card = new Card("4242424242424242", 12, 2016, "123");
    Card card = new Card(cardNumber, cardExpMonth, cardExpYear, cardCVC);
    boolean validation = card.validateCard();

    if (validation) {
        return true;
    } else if (!card.validateNumber()) {
        myUtility.setAlertMessage("Error", "The card number that you entered is invalid.");
    } else if (!card.validateExpiryDate()) {
        myUtility.setAlertMessage("Error", "The expiration date that you entered is invalid.");
    } else if (!card.validateCVC()) {
        myUtility.setAlertMessage("Error", "The CVC code that you entered is invalid.");
    } else {
        myUtility.setAlertMessage("Error", "The card details that you entered are invalid.");
    }
    return false;
}
![]() After card validation, the next step is to get stripeToken and to get stripe token you need add below code in your java class file.
After card validation, the next step is to get stripeToken and to get stripe token you need add below code in your java class file.
![]() In the code, there is a publishable key. You will get the publishable key from API keys in the Stripe account. We would like you to check the screenshot of step number 3.2. Where you will be able to see the publishable key below the SECRET_KEY.
In the code, there is a publishable key. You will get the publishable key from API keys in the Stripe account. We would like you to check the screenshot of step number 3.2. Where you will be able to see the publishable key below the SECRET_KEY.
As per Stripe’s recommendation, we fetch the keys by making an API call to https URL. The best practice is to save the keys on a secured database in encrypted form and on user request decrypt it and send the keys to the user on making an API call for keys.
Now we need to call an API to get these keys from a secured server. For that we can have an https API call which will return us the publishable key from server.
private String userPublishableKey = "";
private String userSecretKey = "";

/**
* This is standerd api call method which will get the user's key from server
**/
private void getUserKey() {
    // Call api and get user publishable & secret key here and assign key value in userPublishableKey & userSecretKey
}

Card card = new Card(cardNumber, cardExpMonth, cardExpYear, cardCVC);
try {
    Stripe stripe = new Stripe(userPublishableKey);stripe.createToken(
    card,
    publishableKey,
    new TokenCallback() {
        public void onSuccess(Token token) {
        if (myUtility.checkInternetConnection()) {
            sendCardToInfoToStripe(token.getId(), isLive);
        } else {
            myUtility.setInternetAlertMessage();
        }
        }
        public void onError(Exception error) {
        myUtility.setAlertMessage("Error", error.getMessage());
        }
    });
![]() In the case of the payment process without login, you need to add the below code to open dialogue of webview of Stripe.
In the case of the payment process without login, you need to add the below code to open dialogue of webview of Stripe.
final Dialog dialog = new Dialog(ChargeCardActivity.this);
    dialog.requestWindowFeature(Window.FEATURE_NO_TITLE);
    dialog.setContentView(R.layout.custom_connect_alert_dialog_with_msg);
    dialog.setCanceledOnTouchOutside(false);

    TextView textDialog = (TextView) dialog.findViewById(R.id.textDialog);
    textDialog.setText(getString(R.string.lbl_stripe_not_connected));
    TextView textCancel = (TextView) dialog.findViewById(R.id.textCancel);
    TextView textOk = (TextView) dialog.findViewById(R.id.textOk);

    // if button is clicked, close the custom dialog
    textCancel.setOnClickListener(new View.OnClickListener() {
        @Override
        public void onClick(View view) {
            dialog.dismiss();
        }
    });

    textOk.setOnClickListener(new View.OnClickListener() {
        @Override
        public void onClick(View v) {
            dialog.dismiss();
            Intent intent = new Intent(ChargeCardActivity.this, WebviewPaymentActivity.class);
            intent.putExtra(Constants.ISLIVE, isLive);
            intent.putExtra(Constants.CARD_NUMBER, cardNumber);
            intent.putExtra(Constants.CARD_CVC, cardCVC);
            intent.putExtra(Constants.CARD_EXP_MONTH, cardExpMonth);
            intent.putExtra(Constants.CARD_EXP_YEAR, cardExpYear);
            intent.putExtra(Constants.CENT_AMOUNT, centAmount);
            intent.putExtra(Constants.USER_DESCRIPTION, userDescription[bad code]);
            intent.putExtra(Constants.USER_EMAIL, userEmail);
            intent.putExtra(Constants.USER_CURRENCY, sessionManager.getStringDetail(Constants.USER_CURRENCY));
            intent.putExtra(Constants.USER_PUBLISHABLE_KEY, userLivePublishableKey);
            startActivity(intent);
        }
    });

    dialog.show();
![]() Custom_connect_alert_dialog_with_msg.xml
Custom_connect_alert_dialog_with_msg.xml
<?xml version="1.0" encoding="utf-8"?>
<LinearLayout xmlns:android="http://schemas.android.com/apk/res/android"
    android:layout_width="match_parent"
    android:layout_height="wrap_content"
    android:background="@color/color_dialog_background"
    android:orientation="vertical">

    <TextView
            android:id="@+id/textDialog"
            android:layout_width="match_parent"
            android:layout_height="wrap_content"
            android:layout_margin="10dp"
            android:gravity="left"
            android:padding="10dp"
            android:text="Your stripe live account is not connceted. DO you wan't to connect it and make payment?"
            android:textColor="@android:color/white"
            android:textSize="17sp" />
    <View
        android:layout_width="match_parent"
        android:layout_height="1dp"
        android:background="@color/color_dialog_button_border" />

    <LinearLayout
        android:layout_width="match_parent"
        android:layout_height="wrap_content"
        android:orientation="horizontal"
        android:weightSum="2">

        <TextView
            android:id="@+id/textOk"
            android:layout_width="0dp"
            android:layout_height="wrap_content"
            android:layout_weight="1"
            android:gravity="center"
            android:padding="@dimen/scal_15dp"
            android:text="Proceed"
            android:textColor="@color/color_white"
            android:textSize="17sp" />
        <View
            android:layout_width="1dp"
            android:layout_height="match_parent"
            android:background="@color/color_dialog_button_border" />

        <TextView
            android:id="@+id/textCancel"
            android:layout_width="0dp"
            android:layout_height="wrap_content"
            android:layout_weight="1"
            android:gravity="center"
            android:padding="@dimen/scal_15dp"
            android:text="Cancel"
            android:textColor="@android:color/white"
            android:textSize="17sp" />
    </LinearLayout>

</LinearLayout>
![]() The below code is to make your Stripe payment integration based on the commission transaction you would like to set.
The below code is to make your Stripe payment integration based on the commission transaction you would like to set.
In the below code we have used cents 1000 as a total amount transaction and 100 as a commission. You can also define the currency through the below code.
NOTE: While integrating Stripe Payment Gateway, stripe itself doesn’t recommend storing key data in the application we store the key information in encrypted form on the database and we make an https web API call to get the decrypted keys.
We get userSecretKey from an API call to the server.
private void sendCardToInfoToStripe(final String cardToken, final boolean isLive) {
    userDescription = editRefDesc.getText().toString(); // Get User Description[bad code]
    userEmail = editEmail.getText().toString(); // Get User Email Id
    new Thread(new Runnable() {
        @Override
        public void run() {
            Map<String, Object> chargeParams = new HashMap<String, Object>();
            chargeParams.put("amount", 1000);
            chargeParams.put("currency", "usd");
            chargeParams.put("source", cardToken);
            chargeParams.put("description", userDescription);
            chargeParams.put("receipt_email", userEmail);
            chargeParams.put("application_fee", 100);
            RequestOptions requestOptions;
            requestOptions = RequestOptions.builder()
.setStripeAccount(sessionManager.getStringDetail(Stripe-user-id))
                                .setApiKey(userSecretKey)
                                .build();

            try {
                Charge.create(chargeParams, requestOptions);
                callSuccess();
            } catch (final Exception e) {
                myUtility.dismissDialog();
                e.printStackTrace();
                runOnUiThread(new Runnable() {
                    @Override
                    public void run() {
                        myUtility.setAlertMessage("Error", e.getMessage());
                    }
                });
            }
        }
    }).start();
}
Developer Note: Above codes have used a couple of common classes for general methods like internet checking, alert dialogues. We are putting here all the common methods code.
public class Utility {
    public boolean checkInternetConnection() {
        ConnectivityManager conMgr = (ConnectivityManager) context.getSystemService(Context.CONNECTIVITY_SERVICE);
        // ARE WE CONNECTED TO THE NET
        if (conMgr.getActiveNetworkInfo() != null &&
        conMgr.getActiveNetworkInfo().isAvailable() &&
        conMgr.getActiveNetworkInfo().isConnected()) {
            return true;
        } else {
            return false;
        }
    }

    public void setInternetAlertMessage() {
        if (context == null) return;
        dialog = new Dialog(context);
        dialog.requestWindowFeature(Window.FEATURE_NO_TITLE);
        dialog.setContentView(R.layout.custom_alert_dialog);
        dialog.setCanceledOnTouchOutside(false);
        TextView textDialog = (TextView) dialog.findViewById(R.id.textDialog);
        textDialog.setText(context.getString(R.string.msg_internet_connection));
        textDialog.setPadding(15, 15, 15, 15);
        textDialog.setGravity(Gravity.CENTER);

        TextView textOk = (TextView) dialog.findViewById(R.id.textOk);
        // if button is clicked, close the custom dialog
        textOk.setOnClickListener(new View.OnClickListener() {
            @Override
            public void onClick(View v) {
                dialog.dismiss();
            }
        });
        dialog.show();
    }

    public void setAlertMessage(String title, String msg) {
        if (context == null) return;

        dialog = new Dialog(context);
        dialog.requestWindowFeature(Window.FEATURE_NO_TITLE);
        dialog.setContentView(R.layout.custom_alert_dialog);
        dialog.setCanceledOnTouchOutside(false);
        TextView textDialog = (TextView) dialog.findViewById(R.id.textDialog);
        textDialog.setText(msg);
        textDialog.setPadding(15, 15, 15, 15);
        textDialog.setGravity(Gravity.CENTER);

        TextView textOk = (TextView) dialog.findViewById(R.id.textOk);
        textOk.setOnClickListener(new View.OnClickListener() {
            @Override
            public void onClick(View v) {
                dialog.dismiss();
            }
        });
        dialog.show();
    }
}
Re-Note: Perform all steps carefully while you are moving the codes from Test to Live.
The challenging task was to get a user through the authentication, which can be performed on the web only. Thus, we enable a user to the same experience in native application and managed all redirection of a web, as we are not getting any callbacks from stripe SDK, and in the end, we achieved this by observing the redirections.
We would like to share with the app owners that when they are in a situation of choosing a payment gateway or any of the payment integration services, it would be suggested to check the target audience, and then search the payment gateway support of that region.
For example, if you need to have payment from the Middle East or Northern Africa then Hyper Pay is one of the best payment gateway solutions or if you are targeting the US, UK, Canada, Australia then Stripe payment gateway integration is the best solution. After that, we need to check the costing structure, refund fees and time used by the payment gateway to transfer money to the bank account.
We would love to hear back your words for Stripe payment gateway integration in Android and share your feedback for the above content.
Frequently Asked Questions
What if an Android app is not redirecting back to the app after completing a PaymentIntent?
To resolve this, make sure you have implemented a return_url in the PaymentIntent and that the URL is in the AndroidManifest.xml file.
Is Stripe a good payment gateway?
Currently, Stripe is one of the best online credit card processors, allowing businesses to build a custom eCommerce experience by leveraging its free API. It is easy to implement and offers bank-grade security to merchants and their customers.
Will my customers need a Stripe account to pay?
No. Your customers can complete their transactions with their debit/credit cards. They don’t need an individual Stripe account to complete their payment.
Will my customers know that I’m using the Stripe payment gateway on my application?
Not necessarily. Your customers won’t be able to know that you are using the Stripe payment gateway on your application.
Conclusion
Stripe is making a difference in the developer community through its payment service integration, user-friendly documents and API. We used our mobile application development services for the Stripe integration in Android, and our recent mobile application development in Stripe got 3000 users in the first week of the launch, 45000 amount of transaction happening every day, and almost 100+ reviews and a 4.1-star rating on the Google Play store. This application was in top charted apps in the finance category in the first quarter of the year 2016. We would love to hear back your words for Stripe payment gateway integration in Android and share your feedback.
Apart from this, if you have any Android app idea that you want to discuss with any leading Android app development company, connect it with us and we will be guiding you further.