At WWDC Developer Conference 2019, Apple released the latest iOS 13 with a huge list of new features and functionalities. It was the second major and one of the most important revisions of an Operating System which is being used on more than 1 Billion iOS devices worldwide.
One of the most important updates that they announced in the iOS Background Tasks framework. Being a leading iOS development company, we decided to tell our readers how to implement it. In this technical blog, we are going to understand how to schedule iOS background tasks.
So, this iOS tutorial is for those who want to implement the background task scheduler in their latest iOS app development project. You’re going to see an example of using the new BackgroundTasks framework for fetching images in the background, while the phone is in idle mode.
Table of Contents
The most significant thing that Apple has brought is the Optimized Trend, which was launched with iOS 12, now making iOS 13 faster & more efficient. The app updating time has been improved, while the app launching time has become 2x quicker. Also, the app download size has been reduced to half (50%).
Do You Want to Develop an iOS App?
Looking to develop an iOS app? Get in touch with our experienced iOS app developers for a free consultation.

Let’s talk about some new features and functionalities of iOS 13 and then move on to understand one of the most important functionalities- the BackgroundTasks framework.
Here’s a list of some of the important features brought in iOS 13:
- Dark Mode
- Revamped Photos app
- Sign In with Apple (which we already covered in detail with illustration)
- HomeKit Secure Video
- Name and image in Messages
- Swiping keyboard
- Multi-user HomePod
- All-new Reminders app
- Memoji and stickers
- Smarter, smoother Siri voice assistance
In terms of technical functionalities, Apple has introduced:
- Advances in contextual action menus in iOS, macOS, and iPadOS
- UIWindowScene API and multitasking in iPadOS
- AI/ML functionalities like Image and Speech saliency, Word embeddings, Sound analysis, Text catalog and recognition, Image similarity & classification, On-device speech, Face capture quality, Sentiment classification
- Conversational shortcuts in Siri for apps
- New BackgroundTasks Framework
In this iOS app tutorial, we will talk about the “BackgroundTasks Framework”.
BackgroundTasks Framework
This new framework is used for tasks like cleaning a database, updating a machine learning model, or updating the displayed data for an app, and other deferrable tasks that are better done in the background. It makes efficient use of processing time and power and runs tasks like these when the device is in idle condition.
BackgroundTasks Framework has two main task requests under BGTaskScheduler:
- BGAppRefreshTaskRequest: This is a request to launch an app in the background to execute a short refresh task.
- BGProcessingTaskRequest: This is a request to launch an app in the background and execute a process that takes a longer time to complete.
BackgroundTasks can be used to perform various activities like database cleaning, uploading pictures to a server, and syncing pictures in other devices.
Our expert iOS developers at Space-O Technologies received a lot of queries from our clients and other developers when BackgroundTasks Framework was introduced. Our developers were happy to help them and decided to come up with a small iOS demo about iOS background image fetching, to explain a few things.
In this iOS tutorial, we are going to take the iOS background task example of fetching the latest count of added images in the image gallery.
Fetching Image Count While Processing Task In Background
Implementing BackgroundTasks Framework in your project
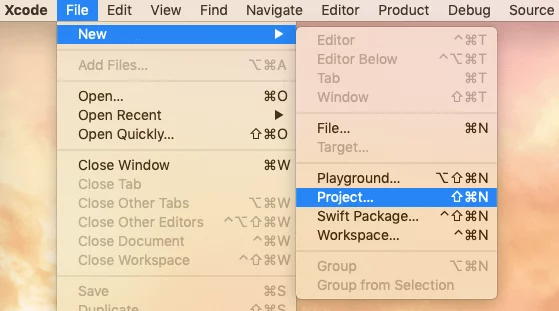
Create a new project using XCODE 11.
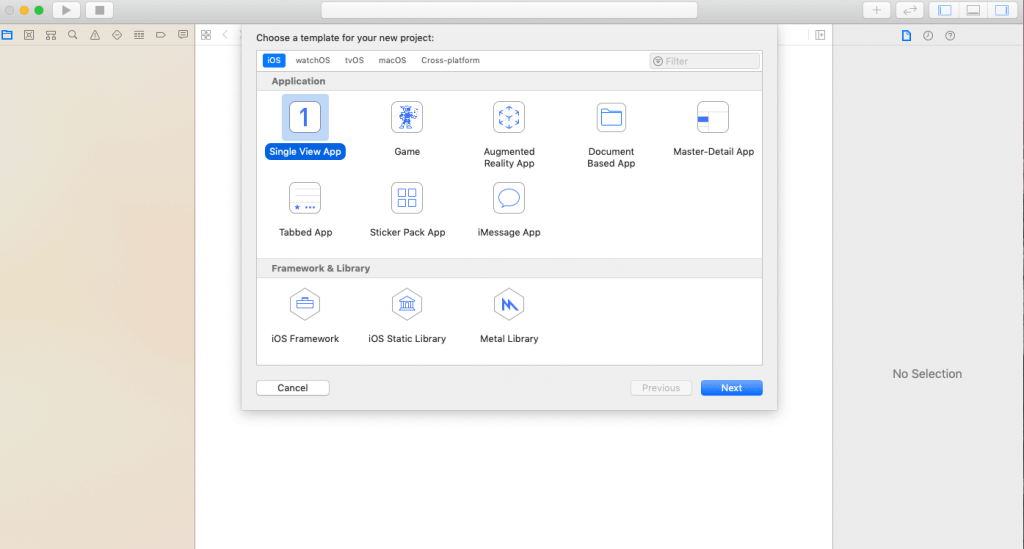
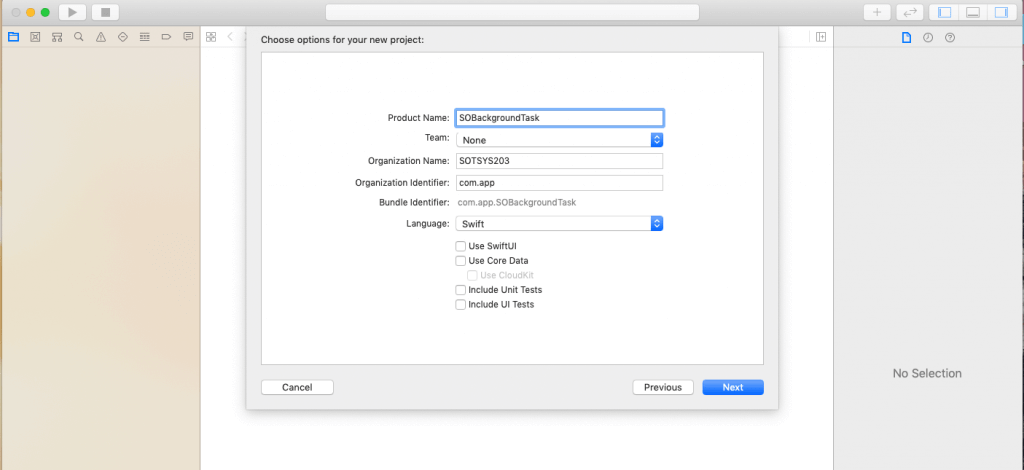
Select “Single View App” in the iOS section and enter the project name. (We have kept the project name as “SOBackgroundTask”).
Go to SoBackgroundTask Target and click on “Signing & Capabilities”, then click on “+ Capability”,

Double-tap on “Background Modes”
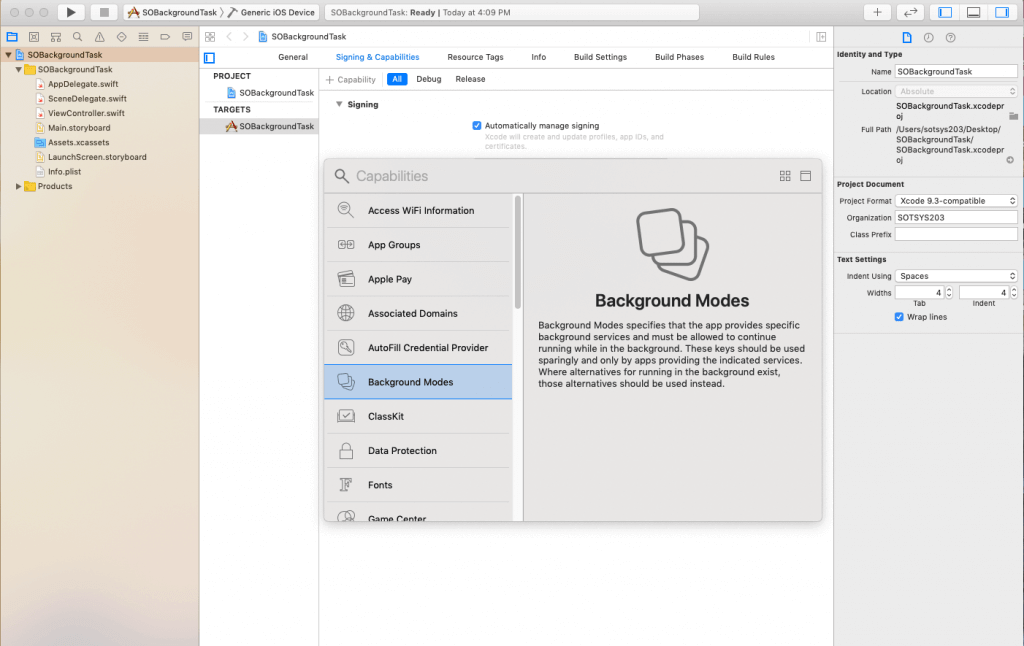
Select “Background Fetch” and “Background Processing” from all background tasks.

Add “BGTaskSchedulerPermittedIdentifiers” key in info.plist and add a task identifier array.

Note: The system only runs the tasks registered with identifiers on a whitelist of task identifiers.
import BackgroundTasks in AppDelegate.swift.
Create registerBackgroundTaks() method with identifier (use the same identifier we used in info.plist) and call it from Application:didFinishLaunchingWithOptions
func application(_ application: UIApplication, didFinishLaunchingWithOptions launchOptions: [UIApplication.LaunchOptionsKey: Any]?) -> Bool {
    registerBackgroundTasks()
    return true
}

// MARK: Register Background Tasks
private func registerBackgroundTasks() {
    BGTaskScheduler.shared.register(forTaskWithIdentifier: "com.SO.imagefetcher", using: nil) { task in
        // This task is cast with processing request (BGProcessingTask)
        self.scheduleLocalNotification()
        self.handleImageFetcherTask(task: task as! BGProcessingTask)
    }

    BGTaskScheduler.shared.register(forTaskWithIdentifier: "com.SO.apprefresh", using: nil) { task in
        // This task is cast with processing request (BGAppRefreshTask)
        self.scheduleLocalNotification()
        self.handleAppRefreshTask(task: task as! BGAppRefreshTask)
    }
}
Create scheduleImagefetcher() and scheduleAppRefresh() method for fetching images from the gallery and refresh the app once image fetch is completed. These methods are called from applicationDidEnterBackground.
func applicationDidEnterBackground(_ application: UIApplication) {
    scheduleAppRefresh()
    scheduleImageFetcher()
}

func scheduleImageFetcher() {
    let request = BGProcessingTaskRequest(identifier: "com.SO.imagefetcher")
    request.requiresNetworkConnectivity = false // Need to be true if your task needs network processing. Defaults to false.
    request.requiresExternalPower = false
    // If we keep requiredExternalPower = true, then it requires the device to be connected to external power.

    request.earliestBeginDate = Date(timeIntervalSinceNow: 1 * 60) // fetch Image Count after 1 minute.
    // Note: EarliestBeginDate should not be set too far into the future.
    do {
        try BGTaskScheduler.shared.submit(request)
    } catch {
        print("Could not schedule image fetch: \(error)")
    }
}

func scheduleAppRefresh() {
    let request = BGAppRefreshTaskRequest(identifier: "com.SO.apprefresh")
    request.earliestBeginDate = Date(timeIntervalSinceNow: 2 * 60) // App Refresh after 2 minutes.
    // Note: EarliestBeginDate should not be set too far into the future.
    do {
        try BGTaskScheduler.shared.submit(request)
    } catch {
        print("Could not schedule app refresh: \(error)")
    }
}
Note: You need to cancel pending background tasks if any, otherwise it will display error code=2.
To cancel the pending background task, we call the below method before scheduling a new task.
func cancelAllPendingBGTasks() {
    BGTaskScheduler.shared.cancelAllTaskRequests()
}
Note: iOS background task time limit is 30 seconds, the policy is still the same.
Frequently Asked Questions
When was iOS 13 announced?
iOS 13 was announced during the Worldwide Developer’s Conference in June 2019 and released on 19 September 2019.
Which are the best features of iOS 13?
Some of the best features of iOS 13 are:
- Easy switching Wi-Fi networks and Bluetooth devices
- Allows downloading large applications on mobile data
- Dual-SIM support
- Able to delete apps directly from the App Store
- Silent Mode display improved
Conclusion
We hope this iOS tutorial has helped you to understand how BackgroundTasks Framework works. You can get the source code by referring to the GitHub demo.
Here, we took only one example of fetching images in the background, there are various tasks for which we can use this framework. Apart from this, we have also shared information regarding the latest features of Swift 5 and enabling dark mode on iOS 13 if you want to read.
Let us know if you have any suggestions or queries in this tutorial or any questions regarding the iPhone app development. We are one of the leading iPhone app development companies and already developed over 2800 iOS apps successfully.
So, if you have an iPhone app idea that you want to create with advanced features and functionalities like this one, discuss it with us through our contact form. We are all ears!
