
 By
By 
Contents
The success of a web application often depends less on the code you write and more on how you deploy it. Building a web application is only half the battle. The real challenge begins when you need to deploy it for actual users without breaking anything in the process.
A single misconfigured environment variable, a skipped database migration, or an overlooked SSL certificate can bring your entire application down. And when that happens, the cost is not just technical. It is lost revenue, frustrated users, and damaged credibility. Yet most deployment failures are preventable. They come down to gaps in software development planning, not skill gaps.
This guide walks you through the entire web application deployment process from start to finish. You will learn how deployment environments work, which deployment strategies minimize risk, how CI/CD pipelines automate your releases, and how to choose the right hosting platform for your project.
Whether you are a startup deploying your first MVP application or a CTO scaling an enterprise system across regions, this guide provides a clear, actionable framework you can deploy without second-guessing every step.
Let’s start with the fundamentals.
What Is Web App Deployment?
Web app deployment is the process of making your application accessible to users on the internet. It involves moving your code, assets, and dependencies from a local development setup to a production server. Once deployed, users can interact with your application through a web browser. As a core part of software deployment, this go-live process determines whether your product succeeds or fails at launch.
Deployment is not just about uploading files to a server. So what is web application deployment in practice? It includes configuring the application hosting environment, setting up databases, and connecting domain names. Everything must run smoothly under real traffic. The goal is to create a stable, secure, and fast experience for every user who visits your application.
Why web app deployment matters in the software development lifecycle
Deployment sits at the critical junction between custom web app development and real-world usage. A well-executed deployment turns your planning, design, coding, and testing into a functional product that users can access. A poorly executed one can erase months of effort in minutes.
Here is why deployment deserves serious attention at every stage of the software development lifecycle:
- Uptime and availability: Deployment directly controls whether your application stays accessible. For SaaS platforms and customer-facing portals, even minutes of downtime translate to lost revenue and support tickets.
- Performance: Page load speed, server response times, and resource allocation all depend on how and where you deploy. Poor deployment choices create bottlenecks that frustrate users before they even interact with your product.
- Data security: Misconfigured servers, exposed environment variables, or skipped encryption steps during deployment open the door to breaches and compliance violations.
- User trust and retention: Users do not separate your product from its performance. Slow loads, crashes, and outages damage credibility and push users toward competitors.
- Stakeholder alignment: Deployment provides a shared environment where teams can review, validate, and approve changes before they reach end users.
- Structured release management: A proper deployment process ensures every update follows a defined path from code to production. It closes the gap between “it works on my machine” and “it works for our users.”
That transition from development to production is where deployment earns its importance. Get it right, and every release strengthens your product. Get it wrong, and no amount of great code can save the user experience. That is why every engineering team needs to understand how to deploy a web application safely.
Key components of a web app deployment system
Every deployment system, regardless of scale or complexity, relies on three core components working together. Understanding each one gives you a clear foundation for every deployment decision that follows.
1. Deployment source
This is the location where your application code lives. It is typically a Git repository hosted on platforms like GitHub, GitLab, or Bitbucket. Source code management through version control ensures every change is tracked, reversible, and auditable. Without a reliable source, nothing downstream can function properly.
2. Build pipeline
The build pipeline reads your source code and prepares it for production. This stage compiles code, minifies files, runs automated tests, and packages components into deployable artifacts. Tools like GitHub Actions, Jenkins, and CircleCI automate this step so that builds stay consistent across every release.
3. Deployment target
This is the application server or hosting environment where your application actually runs. Options range from cloud instances on AWS and Azure to PaaS platforms like Heroku or serverless functions on AWS Lambda. The target receives the built artifact, serves it to users, and handles incoming traffic.
These three components form the backbone of every deployment workflow. When your source, pipeline, and target are properly configured and connected, deployments become repeatable and predictable. When any one of them breaks down, the entire release process stalls.
Web App Deployment Environments Explained
Before your application reaches real users, it passes through multiple environments. Each environment serves a different purpose in the testing and validation process. Skipping any of them increases the risk of bugs, outages, and security issues in production.
Development environment
The development environment is your local machine where you write and test code. It runs on localhost and uses mock data or a local database. Hot reloading and debugging tools make it easy to iterate quickly on features.
This environment is designed for speed, not accuracy. It rarely mirrors the production setup in terms of server configuration, database size, or network conditions. Relying solely on local testing before deployment is a common mistake that leads to production failures.
Staging environment
The staging environment is a near-exact replica of your production setup. It uses the same server configuration, database engine, and third-party integrations. Teams use it for quality assurance (QA), user acceptance testing (UAT), and client demonstrations.
Staging catches issues that local testing misses. Problems like memory leaks under load, broken API integrations, and database migration failures surface in staging. It serves as the final checkpoint before code reaches real users.
Production environment
The production environment is the live server where real users access your application. It handles actual traffic, stores real data, and operates under strict security and performance requirements. Any issue here directly impacts your users and your business.
Production requires active monitoring, automated alerts, and rapid incident response. It also needs robust backup systems and disaster recovery plans. Knowing how to deploy web application code to production safely is critical. Treating production as “just another server” is one of the costliest mistakes a development team can make.
How to maintain environmental parity
Environment parity means keeping your development, staging, and production setups as identical as possible. When environments differ, code that works in one stage can break in the next. This creates unpredictable failures when you deploy a web application to production.
Docker is the most effective tool for maintaining parity. By containerizing your application, you create a consistent runtime that behaves the same across all environments. The same PHP version, the same Node.js configuration, and the same database engine run everywhere.
Environment variables also play a key role. Store configuration settings like database credentials, API keys, and service URLs as environment variables rather than hardcoding them. This allows the same codebase to adapt to different environments without code changes. The 12-factor app methodology provides a solid framework for managing this approach.
Pre-Deployment Checklist for Web Applications
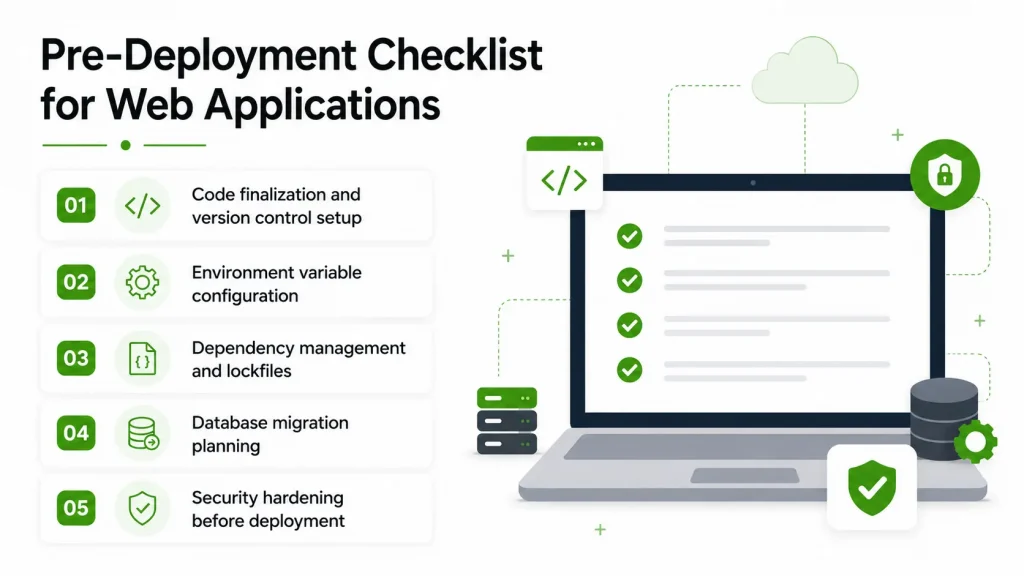
Rushing into deployment without a checklist is how teams end up with broken production systems. A structured web application deployment checklist ensures that nothing critical gets missed before your application goes live. Treat this as a mandatory step, not an optional one.
1. Code finalization and version control setup
Finalize your codebase before starting the deployment process. This means all features are complete, all pull requests are reviewed, and all branches are merged.
Tag your release in Git with a clear version number (e.g., v2.1.0). This makes it easy to identify exactly which code is running in production. It also simplifies rollbacks if something breaks after launch. Use a branching strategy like GitFlow or trunk-based development to keep your repository organized.
2. Environment variable configuration
Set up all environment variables your application needs in production. These include database connection strings, API keys, third-party service credentials, and feature toggle settings.
Never hardcode sensitive values in your source code. Use a secrets manager like AWS Secrets Manager, HashiCorp Vault, or Doppler to store and retrieve them securely. Add your .env file to .gitignore so it never gets committed to your repository.
3. Dependency management and lockfiles
Lock your dependencies before deployment. Lockfiles like package-lock.json, composer.lock, or requirements.txt freeze dependency versions. They ensure the same library versions install in production as in development.
Without lockfiles, a minor version update in a third-party package can introduce breaking changes during deployment. This is the classic “works on my machine” problem. Lockfiles eliminate it by freezing dependency versions across all environments.
4. Database migration planning
Plan your database schema changes before deployment. Write migration scripts that can run automatically during the deployment process. Tools like Laravel Migrations, Django Alembic, Flyway, and Prisma Migrate handle this effectively.
Always create a full database backup before running migrations. Test your migration scripts in the staging environment first. If a migration fails in production, you need a reliable rollback path. That path must restore both the schema and the data.
5. Security hardening before deployment
Disable debug mode in your application framework. Verbose error messages that help during development become security vulnerabilities in production. They can expose file paths, database queries, and server configurations to attackers.
Rotate all API keys and passwords before going live. Run a vulnerability scan using tools like Snyk or OWASP ZAP. Verify that your application enforces HTTPS for all connections. These checks take minutes but prevent serious security incidents. Completing them before you deploy web app code reduces your exposure to common attack vectors.
A complete checklist removes guesswork from the deployment process and gives your team a repeatable, reliable workflow.
Need Help Deploying Your Web Application?
Our web development team handles deployment end-to-end, from environment setup to production launch and monitoring.

Step-by-Step Web Application Deployment Process
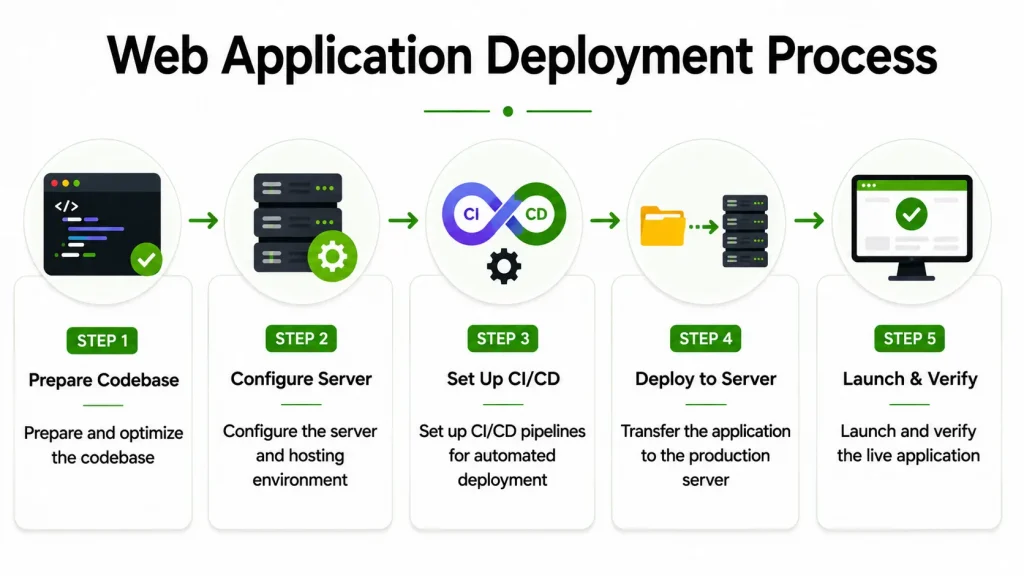
Knowing the theory is important, but deployment is ultimately a practical, hands-on process. This section walks you through each step in sequence. Follow this workflow to move your application from a finalized codebase to a live, accessible product.
Step 1: Prepare and optimize the codebase
Start by optimizing your code for production performance. Minify all CSS and JavaScript files to reduce file sizes. Compress images using tools like ImageOptim or SharpJS. Enable Gzip or Brotli compression on your server for faster content delivery.
Remove all console logs, debugging statements, and test data from your codebase. Tree-shake unused code using web application development tools like Webpack, Vite, or Rollup. These steps reduce load times and improve the overall user experience from the very first visit.
Step 2: Configure the server and hosting environment
Set up your production web server before transferring any files. Configure Nginx or Apache as your web server. Set up a reverse proxy if your application runs behind a Node.js or Python backend.
Point your domain name to the server’s IP address through your DNS provider. Install an SSL certificate using Let’s Encrypt or your hosting provider’s built-in tool. Configure firewall rules to allow only necessary traffic (HTTP, HTTPS, SSH) and block everything else. This foundational setup determines how securely you can deploy a web app in production.
Step 3: Set up CI/CD pipelines for automated deployment
Manual deployment using FTP or SSH is error-prone and time-consuming. CI/CD (Continuous Integration/Continuous Deployment) pipelines automate the entire build, test, and deploy workflow. Every time you push code to your repository, the pipeline runs automatically.
A basic pipeline connects your Git repository to a build stage that compiles code and runs tests. If all tests pass, the pipeline deploys the artifact to your production server. Tools like GitHub Actions, Jenkins, and GitLab CI/CD make this setup straightforward. The dedicated CI/CD section later in this guide covers the setup process in detail.
Step 4: Transfer the application to the production server
Transfer your finalized, tested application to the production environment. The method depends on your infrastructure. Git-based platforms like Vercel and Netlify deploy automatically on every push. For cloud deployment, servers on AWS or Azure typically use CI/CD pipeline triggers or Docker image pulls.
For traditional setups, secure copy (SCP) or SFTP transfers work as a fallback. Regardless of the method, verify that all files, dependencies, and environment variables are in place before launching. A missing configuration file can break your application silently.
Step 5: Launch and verify the live application
Once the transfer is complete, launch your application and run a series of verification checks. Visit your domain to confirm the application loads correctly. Test critical user flows like login, registration, payments, and form submissions.
Check your SSL certificate by verifying the padlock icon in the browser. Run a performance test using Google Lighthouse or WebPageTest. Verify DNS propagation using tools like whatsmydns.net. These checks confirm that your deployment is clean, functional, and ready for real traffic.
This five-step process gives your team a repeatable framework for every deployment cycle. It covers how to deploy a web application from code optimization through production verification. When each step is documented and followed consistently, deployments shift from high-stress events to routine operations. The key is to treat deployment as a structured workflow, not a one-time task.
Ready to Deploy Your Web Application?
From architecture planning to production launch and ongoing support, our team manages the entire deployment lifecycle for your web app.
Web Application Deployment Strategies
Not every deployment needs to happen the same way. The strategy you choose determines your downtime risk, rollback speed, and deployment complexity. This section covers seven common approaches used in modern web development.
1. Manual deployment
Manual deployment involves uploading files directly to a web server using FTP, SCP, or SSH. The developer connects to the server, transfers updated files, and restarts the application manually.
This approach works for small projects, personal websites, or quick fixes. For anyone learning how to deploy a website for the first time, it offers the lowest barrier to entry. However, it is slow, error-prone, and impossible to scale. There is no automated testing, no rollback mechanism, and no deployment history. For production applications serving real users, manual deployment introduces unnecessary risk.
2. Rolling deployment
Rolling deployment replaces application instances one at a time instead of all at once. The system takes one server out of rotation, deploys the new version, and verifies it. Then it moves to the next server.
This strategy provides zero downtime because some instances always remain active. It also limits the blast radius of a bad deployment. If the new version fails on one server, the remaining servers continue serving the stable version. The trade-off is that two versions of your application run simultaneously during the rollout. Your application must handle this gracefully, especially for API changes and database schema updates.
3. Blue-green deployment
Blue-green deployment maintains two identical production environments. The “blue” environment runs the current version. The “green” environment runs the new version. Once the green environment passes all tests, a load balancer switches all traffic from blue to green.
This web deployment strategy offers instant rollback. If the new version has issues, you switch traffic back to the blue environment in seconds. The downside is cost. Running two full production environments doubles your infrastructure expenses during the deployment window. Database synchronization between the two environments also requires careful planning.
4. Canary deployment
Canary deployment routes a small percentage of user traffic (typically 1% to 5%) to the new version. The rest of the traffic continues hitting the current version. If the canary version performs well, you gradually increase the traffic percentage until the rollout is complete.
This approach provides real-world validation with minimal risk. It catches performance regressions, edge-case bugs, and compatibility issues that staging environments miss. The complexity lies in traffic management and monitoring. You need a load balancer that supports weighted routing. You also need monitoring that compares metrics between versions in real time.
5. Recreate deployment
Recreate deployment shuts down the current version completely before starting the new one. The old application stops, the new application deploys, and then the system restarts. There is no overlap between versions.
This is the simplest website deployment strategy to implement, but it guarantees downtime during the transition. It works for internal tools, admin panels, and applications with scheduled maintenance windows. For customer-facing products, recreating deployment is rarely recommended. Use it only when the downtime window is short and communicated in advance.
7. A/B testing deployment
A/B testing deployment serves two different versions of your application to different user segments simultaneously. Unlike canary deployment, the goal is not risk mitigation. The goal is data-driven decision-making.
Each version includes a specific feature variation. User behavior metrics (conversion rates, engagement, bounce rates) determine which version performs better. This strategy requires robust analytics integration and clear success metrics defined before the deployment starts. It is most effective for UI changes, pricing page experiments, and onboarding flow optimization.
8. Feature flag deployment
Feature flag deployment separates the act of deploying code from the act of releasing features. You deploy new code with the feature turned off using a toggle. Once the code is live and stable, you enable the feature incrementally using the flag.
Tools like LaunchDarkly, Unleash, and Flagsmith manage feature flags at scale. This approach lets you deploy daily without exposing unfinished features to users. It also enables instant kill switches for problematic features without redeploying code.
How to choose the right deployment strategy
The best strategy depends on your application’s requirements, team size, and risk tolerance.
| Strategy | Downtime | Rollback Speed | Infrastructure Cost | Complexity | Best For |
| Manual | Possible | Slow (manual) | Low | Low | Small personal projects. |
| Rolling | None | Moderate | Standard | Medium | Multi-instance production apps. |
| Blue-Green | None | Instant | High (2x infra) | Medium | Mission-critical applications. |
| Canary | None | Fast | Standard + routing | High | High-traffic public platforms. |
| Recreate | Yes | Slow | Low | Low | Internal tools with maintenance windows. |
| A/B Testing | None | Fast | Standard + analytics | High | Feature experiments and UX testing. |
| Feature Flag | None | Instant (toggle off) | Standard + flag tool | Medium | Frequent release cycles. |
Most production applications benefit from a combination of strategies. A team might use rolling deployments for routine updates and blue-green deployments for major releases. The choice is not permanent. It should evolve as your application and team grow.
Still Deciding on the Right Deployment Strategy?
Our engineers evaluate your application architecture, traffic patterns, and business goals to recommend a deployment approach that minimizes risk and maximizes uptime.
CI/CD Pipelines for Web App Deployment
Manual deployment might work for the first few releases, but it quickly becomes a bottleneck. CI/CD (Continuous Integration/Continuous Deployment) automates the entire workflow from code commit to production deployment. It is the backbone of modern web application delivery.
What is CI/CD, and why does it matter for deployment
Continuous Integration (CI) automatically builds and tests your code every time a developer pushes a commit. It catches bugs early, before they reach the main branch. Continuous Deployment (CD) takes the tested build and deploys it to production automatically. Some teams prefer Continuous Delivery, which automates everything except the final production push, requiring a manual approval step.
Together, CI/CD removes manual steps, reduces human error, and speeds up release cycles. Build automation and deployment automation to let teams deploy multiple times per day. Faster deployments mean faster feedback, quicker bug fixes, and shorter time-to-market for new features.
How to set up a basic CI/CD pipeline
A basic pipeline follows four stages: source, build, test, and deploy.
- Source stage triggers the pipeline when code is pushed to a specific branch (e.g., main or release).
- Build stage compiles the code, installs dependencies, and creates a production-ready artifact.
- Test stage runs automated tests, including unit tests, integration tests, and end-to-end tests.
- Deploy stage transfers the artifact to the production server and restarts the application.
Start with a simple workflow file in your repository. GitHub Actions uses a .github/workflows/deploy.yml file. GitLab CI uses a .gitlab-ci.yml file. Define each stage, specify the commands, and set the trigger conditions. Once the pipeline runs successfully, you can deploy a web application with a single Git push.
Popular CI/CD tools compared
Choosing the right CI/CD tool depends on your repository host, team size, and infrastructure.
| Tool | Hosting | Free Tier | Learning Curve | Best For |
| GitHub Actions | Cloud (GitHub) | 2,000 minutes/month | Low | Teams using GitHub repositories. |
| Jenkins | Self-hosted | Free (open source) | High | Enterprises need full control. |
| GitLab CI/CD | Cloud or self-hosted | 400 minutes/month | Medium | Teams using GitLab repositories. |
| CircleCI | Cloud | 6,000 minutes/month | Medium | Fast parallel test execution. |
| Bitbucket Pipelines | Cloud (Atlassian) | 50 minutes/month | Low | Teams in the Atlassian ecosystem. |
GitHub Actions is the easiest starting point for most teams. It integrates natively with GitHub, has extensive marketplace actions, and requires minimal configuration. Jenkins offers the most flexibility but demands more setup and maintenance effort.
CI/CD is not optional for modern web deployment. It is the standard practice that separates reliable, repeatable releases from risky manual processes.
Want a Reliable Deployment Pipeline for Your Web App?
Our DevOps engineers set up CI/CD pipelines, automated testing, and zero-downtime workflows tailored to your stack.
How Containerization Eliminates the Biggest Web App Deployment Headaches
Every development team has faced this moment. The application works perfectly in development, passes every test in staging, and then breaks the moment it hits production. The culprit is almost always the same: environment inconsistency.
Containerization exists to solve this exact problem. Instead of manually configuring each server to match your development setup, you package your entire application, its runtime, libraries, and dependencies into one portable unit. That unit runs identically everywhere, making it far easier to deploy web app releases consistently. No surprises. No last-minute fixes. No “it worked on my machine” excuses.
For teams deploying frequently or managing multiple services, containerization is not a nice-to-have. It is the difference between predictable releases and deployment roulette.
What Docker Actually Does for Your Deployment Workflow
Docker strips away the complexity of environment setup by creating lightweight containers. Each container holds everything your application needs to run: the code, the runtime, system libraries, and configuration files. You build it once as a Docker image and deploy that same image to any environment.
Here is what that looks like in practice:
- A Dockerfile defines your setup: It specifies the base operating system, installs dependencies, copies your application code, and sets the startup command. No manual server configuration required.
- The image becomes your deployable artifact: Once built, the Docker image is versioned and stored. Your team can deploy it, roll it back, or share it across environments instantly.
- Every environment runs the same image: Your laptop, your staging server, and your production cluster all run identical containers. Configuration drift disappears.
The result is fewer failed deployments, faster debugging when issues arise, and a release process your team can actually trust.
When a single container is not enough: Kubernetes orchestration
Docker works well when you are running a handful of containers. But what happens when your application scales to dozens or hundreds of containers spread across multiple servers? Managing them manually is not realistic.
That is where Kubernetes takes over. It automates the parts of container management that would otherwise consume your operations team.
- Pods group related containers into the smallest deployable units, sharing storage and networking so tightly coupled services run together.
- Services expose your pods to network traffic, keeping your application reachable even as individual pods are replaced or scaled.
- Auto-scaling adjusts your pod count based on real-time demand. Traffic spikes trigger scale-up. Quiet periods trigger scale-down. No manual intervention needed.
- Self-healing detects crashed or unresponsive pods and replaces them automatically before users notice the impact, building fault tolerance into your infrastructure.
- Helm charts package complex multi-service deployments into reusable, version-controlled templates so your team does not rebuild configurations from scratch.
- Container registries like Docker Hub, Amazon ECR, or GitHub Container Registry store your images centrally, making them accessible to any production cluster.
For enterprise applications where downtime is not an option, Kubernetes provides the automation layer that keeps deployments reliable at scale.
Do You Actually Need Containers? Here Is How to Decide
Not every application needs Docker. Not every Docker setup needs Kubernetes. Adding unnecessary infrastructure creates overhead without delivering value.
Here is a straightforward way to evaluate your situation:
Traditional hosting is the right fit when:
- Your application runs on a single server with predictable, steady traffic.
- You are deploying a straightforward setup like a Laravel app or a WordPress site on managed hosting.
- Your team ships updates infrequently and does not need environment parity across multiple stages.
Docker alone adds real value when:
- Your team deploys multiple times per week and needs consistent environments across development, staging, and production.
- You want to eliminate configuration drift without the complexity of orchestration.
- Onboarding new developers needs to be fast, with a single command spinning up the full local environment.
Kubernetes becomes essential when:
- Your application follows a microservices architecture with multiple independent services.
- Traffic is unpredictable, and your infrastructure needs to scale horizontally on demand.
- High availability is non-negotiable, and failed containers must be replaced automatically.
- You manage deployments across distributed clusters and need centralized orchestration.
The right choice is not always the most advanced one. Match your deployment tooling to your actual complexity, and scale up only when the need is clear.
How to Choose the Right Web App Deployment Platform for Your Project
Picking a deployment platform feels straightforward until you are three months in and dealing with unexpected costs, scaling limitations, or a painful migration. The problem is not a lack of options. There are too many options, each marketed as the best fit for everyone.
The reality is simpler. The right platform depends on your application type, traffic patterns, team expertise, and budget. A startup deploying its first MVP has very different needs than an enterprise running a multi-region SaaS application.
Here is a breakdown of the major platform categories, what each one does best, and how to match them to your project requirements.
Cloud Infrastructure Providers (IaaS)
Cloud infrastructure providers give you raw computing resources: virtual machines, storage, networking, and databases. You control the full stack, from the operating system to the application layer. This flexibility comes with responsibility. Your team manages server configuration, security patches, scaling rules, and deployment pipelines.
The three dominant providers are:
- Amazon Web Services (AWS): The largest cloud platform with the broadest service catalog. AWS offers EC2 for virtual servers, S3 for storage, RDS for managed databases, and Lambda for serverless functions. Its ecosystem covers nearly every deployment scenario, but the learning curve and pricing complexity are significant.
- Google Cloud Platform (GCP): Strong in data analytics, machine learning infrastructure, and Kubernetes support through Google Kubernetes Engine (GKE). GCP’s networking is built on Google’s global infrastructure, which delivers consistent performance for latency-sensitive applications.
- Microsoft Azure: The default choice for organizations already invested in the Microsoft ecosystem. Azure integrates tightly with Active Directory, .NET frameworks, and enterprise compliance tools. It is the leading cloud provider for regulated industries like healthcare and finance.
Best for: Engineering teams with DevOps expertise that need full control over infrastructure, custom networking, and multi-service architectures. Ideal for cloud-native applications, high-traffic platforms, and projects with strict compliance requirements.
Platform-as-a-Service (PaaS)
PaaS platforms abstract away server management entirely. You push your code, and the platform handles provisioning, deployment, scaling, and maintenance. This dramatically reduces the operational burden on your team, but it comes with less control over the underlying infrastructure.
- Heroku: One of the original PaaS platforms. Heroku supports multiple languages and offers a simple Git-based deployment workflow. It is easy to start with, but costs scale quickly, and performance can lag behind dedicated infrastructure at higher traffic levels.
- Render: A modern alternative to Heroku with transparent pricing, automatic SSL, and built-in CI/CD. Render supports web services, static sites, cron jobs, and managed databases from a single dashboard.
- Railway: Designed for developers who want a fast setup without sacrificing flexibility. Railway supports instant deployments from GitHub, environment variable management, and plugin-based databases. Its interface is clean, and the free tier is generous for side projects.
Best for: Startups, small teams, and solo developers who want cloud hosting without managing servers. Ideal for MVPs, internal tools, and early-stage products where speed to market matters more than infrastructure customization.
Static and Jamstack Hosting
Static hosting platforms are built for frontend-heavy applications, marketing sites, and Jamstack architectures. They serve pre-built files from a global CDN, which means near-instant load times and minimal server-side complexity.
- Vercel: Purpose-built for Next.js but supports other frameworks as well. Vercel offers instant global deployments, preview URLs for every pull request, and edge functions for lightweight backend logic. It is the go-to platform for modern React-based applications.
- Netlify: A pioneer in Jamstack hosting. Netlify provides continuous deployment from Git, serverless functions, form handling, and split testing out of the box. Its plugin ecosystem extends functionality without adding infrastructure overhead.
- Cloudflare Pages: Backed by Cloudflare’s edge computing network, this platform delivers fast static site hosting with integrated Workers for server-side logic at the edge. Pricing is aggressive, and the free tier covers most small to mid-sized projects.
Best for: Frontend applications, marketing websites, documentation sites, and Jamstack projects. Ideal for teams that want global performance without managing CDN configuration or origin servers.
Serverless Platforms
Serverless deployment platforms let you deploy individual functions instead of entire applications. You write the logic, upload it, and the platform handles execution, scaling, and billing based on actual usage. There are no servers to provision or maintain.
- AWS Lambda: The most widely adopted serverless platform. Lambda supports multiple runtimes, integrates with the full AWS ecosystem, and provides auto scaling from zero to thousands of concurrent executions. Pricing is based on invocation count and execution duration.
- Google Cloud Functions: A lightweight serverless option tightly integrated with GCP services like Firestore, Pub/Sub, and Cloud Storage. It works well for event-driven workflows and API backends. For simpler projects, Firebase Hosting offers a quick path to deploy static assets and serverless functions under a single Google service.
- Azure Functions: Microsoft’s serverless offering with strong support for C#, JavaScript, and Python. It integrates with Azure services and supports durable functions for long-running workflows.
Best for: Event-driven workloads, API backends, scheduled tasks, and applications with highly variable traffic. Ideal when you want to pay only for actual compute usage rather than provisioned capacity.
Traditional Hosting
Traditional hosting covers shared hosting, virtual private servers (VPS), and dedicated servers. These options predate cloud platforms and still serve a large portion of the web, especially for simpler applications.
- VPS providers (DigitalOcean, Linode, Vultr): VPS hosting gives you a dedicated virtual machine at a predictable monthly cost. You get root access, fixed resources, and full control over the server environment. Setup requires more manual configuration than PaaS, but pricing is straightforward.
- Shared hosting (Bluehost, Hostinger, GoDaddy): The most affordable option to deploy website projects on a budget. Multiple websites share the same server resources. Performance is limited, and you have minimal control over server settings. Suitable for personal sites and low-traffic blogs.
- Dedicated servers: A single physical server reserved entirely for your application. This option provides maximum performance and control but requires significant operational expertise.
Best for: Budget-conscious projects, simple applications, WordPress sites, and teams comfortable with manual server management. Ideal when traffic is predictable, and scaling needs are minimal.
Quick-reference comparison table
| Factor | IaaS (AWS, GCP, Azure) | PaaS (Heroku, Render) | Static/Jamstack (Vercel, Netlify) | Serverless (Lambda) | Traditional (VPS) |
| Setup complexity | High | Low | Low | Medium | Medium |
| Infrastructure control | Full | Limited | Minimal | Minimal | Full |
| Auto-scaling | Configurable | Built-in | Built-in | Automatic | Manual |
| Cost predictability | Variable | Predictable | Predictable | Variable | Fixed |
| Best app type | Enterprise, microservices | MVPs, startups | Frontend, static sites | APIs, event-driven | Simple apps, blogs |
| CI/CD integration | Requires setup | Built-in | Built-in | Requires setup | Manual |
| Vendor lock-in risk | Medium to high | Medium | Low | High | Low |
How to match a platform to your project
With this many options, the selection comes down to five questions:
- What is your application architecture? Monolithic applications run well on PaaS or VPS. Microservices need IaaS or container orchestration. Static frontends belong on Jamstack platforms.
- What does your traffic look like? Predictable, steady traffic suits fixed-cost platforms like VPS or PaaS. Highly variable or spiky traffic favors serverless or auto-scaling cloud infrastructure.
- How much operational overhead can your team handle? Small teams without dedicated DevOps should lean toward PaaS or static hosting. Larger teams with infrastructure expertise can extract more value from IaaS.
- What is your budget model? If you need cost predictability, choose platforms with flat monthly pricing. If you want to minimize waste, serverless pay-per-use models align costs with actual demand.
- How important is migration flexibility? Platforms with proprietary tooling (certain serverless setups, PaaS-specific add-ons) create lock-in. Container-based deployments on IaaS give you the most portability and support a multi-cloud strategy if needed.
The best deployment platform is not the most popular or the most powerful. It is the one that fits your application’s architecture, your team’s capacity, and your project’s growth trajectory without forcing compromises that cost you later.
Common Web App Deployment Mistakes and How to Avoid Them
Even experienced teams make deployment mistakes. The difference is that experienced teams learn from them and build safeguards. Here are the most common errors and how to prevent each one.
Skipping the staging environment
Deploying directly from development to production bypasses your safety net. Changes that work locally can fail in production due to differences in server configuration, data volume, or third-party service behavior. Without staging, every production deployment becomes an uncontrolled experiment.
How to avoid it:
- Set up a staging environment that mirrors your production infrastructure as closely as possible.
- Route every deployment through staging first, even for minor changes or hotfixes.
- Run your full automated test suite in staging before approving any production release.
Hardcoding secrets in the codebase
API keys, database passwords, and authentication tokens should never appear in your source code. A single accidental commit can expose credentials to anyone with repository access. If the repository is public, those secrets are visible to the entire internet.
How to avoid it:
- Store all sensitive values in environment variables, not in code files or configuration files committed to Git.
- Use a dedicated secrets manager like AWS Secrets Manager, HashiCorp Vault, or Doppler for centralized credential management.
- Scan your repository history regularly with tools like GitLeaks or TruffleHog to catch accidental secret commits.
Deploying without a rollback plan
Pushing a new version without a defined path back to the last working state turns every deployment into a one-way door. If something breaks, your team scrambles to fix forward under pressure instead of reverting cleanly.
How to avoid it:
- Define your rollback process before every deployment, not during an incident.
- Use deployment strategies like blue-green or canary releases that make rollbacks a single step.
- Test the rollback process in staging periodically to confirm it works when you actually need it.
Ignoring database migration order
Running application code changes before database migrations, or the other way around, creates mismatches that cause errors, failed queries, or data corruption. This is especially risky in zero-downtime deployment setups.
How to avoid it:
- Coordinate migration timing with your deployment strategy so database changes land before the application code that depends on them.
- Write backward-compatible migrations that work with both the old and new application versions during the transition.
- Test the full migration sequence in staging with production-like data before executing it in production.
Missing environment variables in production
A single missing variable can crash your application silently or cause features to fail without clear error messages. This is one of the most common causes of post-deployment incidents that teams struggle to diagnose quickly.
How to avoid it:
- Maintain a checklist of every required environment variable for each environment.
- Add a startup validation script that checks for all required variables and fails loudly if any are missing.
- Use a .env.example file in your repository that documents every variable without exposing actual values.
Insufficient logging and monitoring
Without monitoring, you discover problems when users report them. By that point, the damage is already done. Silent failures, memory leaks, and slow performance degradation go unnoticed until they escalate into outages.
How to avoid it:
- Deploy application monitoring and alerting alongside your application, not as an afterthought.
- Track key metrics like response times, error rates, CPU usage, and memory consumption from the moment a new version goes live.
- Set up threshold-based alerts that notify your team immediately when metrics deviate from normal baselines.
No health check endpoints
Load balancers and orchestration tools rely on health check endpoints to route traffic correctly. Without them, traffic continues flowing to failed or unresponsive instances, and debugging becomes significantly harder.
How to avoid it:
- Add a simple /health route that returns a 200 status when the application is running correctly.
- Include dependency checks in your health endpoint (database connectivity, cache availability, external API reachability) for deeper health validation.
- Configure your load balancer or orchestration tool to poll the health endpoint at regular intervals and remove unhealthy instances automatically.
Deploying on Fridays
Deploying before the weekend means fewer people are available to respond if something goes wrong. What could be a quick fix on a Tuesday turns into a weekend firefight with a skeleton crew.
How to avoid it:
- Schedule major deployments early in the week when your full team is available to monitor and respond.
- Reserve Fridays for planning, documentation, and non-critical tasks rather than production releases.
- If a Friday deployment is unavoidable, limit it to low-risk changes and ensure on-call coverage is confirmed in advance.
Avoiding these mistakes does not require advanced tools or large budgets. It requires discipline, checklists, and a culture that treats deployment as seriously as development.
Security Best Practices During Web App Deployment
Application security gaps introduced during deployment are among the most exploited vulnerabilities. Attackers scan for misconfigured servers, exposed credentials, and missing encryption within hours. Building security into your web deployment workflow protects users and your business. Key areas include data encryption, authentication, authorization, and secrets management.
1. SSL/TLS and HTTPS configuration
Every production web application must serve traffic over HTTPS. SSL/TLS encryption protects data traveling between your server and the user’s browser. Without it, login credentials and payment details travel as plain text.
Use Let’s Encrypt for free, automated SSL/TLS certificates. Configure your web server to redirect all HTTP requests to HTTPS. Enable HSTS (HTTP Strict Transport Security) headers to prevent downgrade attacks. Set up automated certificate renewal, so your SSL never expires unexpectedly.
2. Secrets management for API keys and credentials
Never store secrets in your source code or commit them to your Git repository. A single exposed API key can give attackers access to your database or cloud account.
Use a dedicated secrets manager like AWS Secrets Manager, HashiCorp Vault, or Doppler. These tools encrypt secrets at rest and rotate keys automatically. Add .env files to your .gitignore and use environment variables to inject secrets at runtime. Review your repository history periodically to ensure no secrets were accidentally committed in the past.
3. Role-based access and least privilege principles
Limit who can deploy to production and what each team member can access. Not every developer needs SSH access to the production server. Not every team member needs database admin privileges.
Use role-based access control (RBAC) to assign permissions based on job function. Developers get access to staging environments. DevOps engineers get deployment permissions. Database administrators get schema modification rights. This approach minimizes the damage from compromised credentials or accidental mistakes.
4. Vulnerability scanning before and after deployment
Vulnerability management starts before every production deployment. Run automated scans using tools like Snyk for dependency issues. OWASP ZAP tests your application for SQL injection, cross-site scripting (XSS), and insecure headers.
GitHub’s Dependabot automatically creates pull requests when vulnerabilities are detected. Integrate these tools into your CI/CD pipeline to block risky deployments automatically. Post-deployment, schedule regular penetration tests and apply security patches promptly to catch issues that automated scanners miss.
Web App Deployment Best Practices
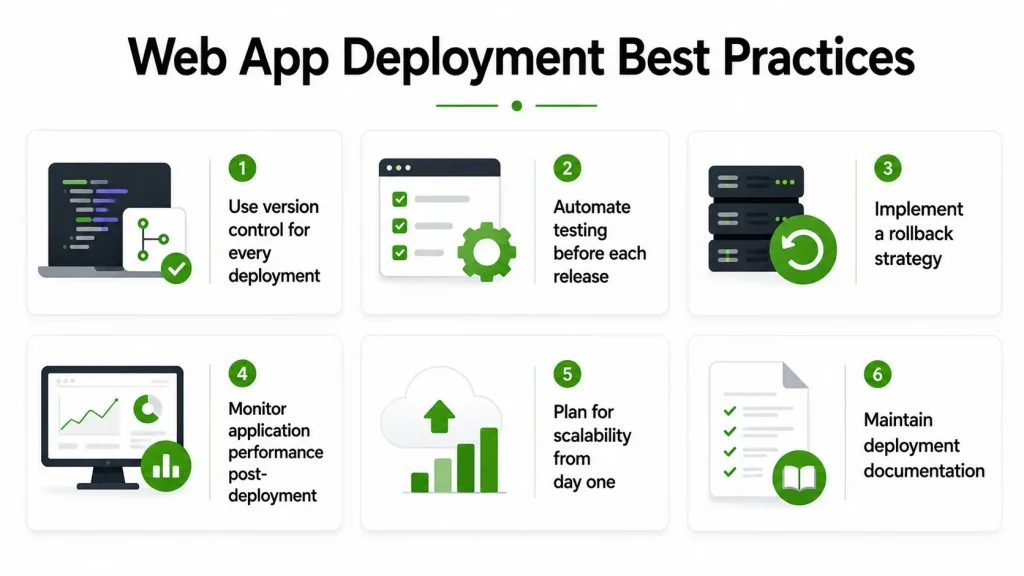
The difference between teams that deploy with ease and teams that dread every release usually comes down to habits, not tools. These six practices apply to every web application, regardless of size, stack, or hosting platform.
1. Use version control for every deployment
Every deployment should trace back to a specific commit in your Git repository. Tag releases with semantic version numbers (v1.0.0, v1.1.0, v2.0.0) so your team always knows what was deployed, when, and by whom. Version control also enables fast rollbacks. If a deployment breaks production, you revert to the last tagged release within minutes instead of guessing which changes caused the problem.
2. Automate testing before each release
Run automated tests every time code enters the deployment pipeline. Unit tests verify individual functions. Integration tests check how components work together. End-to-end tests simulate real user interactions across the full application. A single untested web application deployment can introduce a bug that affects thousands of users. The cost of writing tests is always lower than the cost of fixing a production outage.
3. Implement a rollback strategy
Every deployment plan needs a fast path back to the last stable state. Blue-green deployment offers the fastest rollback through a simple traffic switch. Rolling deployments allow partial rollbacks by stopping the update mid-cycle. Test your rollback process in staging before you need it in production. A rollback plan that has never been tested is not a plan. It is a hope.
4. Monitor application performance post-deployment
Deploy monitoring alongside your application, not after it. Set up performance monitoring to track response times, error rates, CPU and memory usage, and request throughput from the moment the new version goes live. Set up alerts for anomalies. A sudden spike in error rates or a drop in response time often signals a deployment issue. The faster you detect it, the faster you fix it.
5. Plan for scalability from day one
Design your deployment architecture to handle growth before growth arrives. Horizontal scaling adds server instances behind a load balancer. Vertical scaling increases the CPU and memory of existing servers. Add caching layers like Redis or CDN caching to reduce server load. An architecture that scales gracefully makes frequent deployments to multiple servers manageable rather than chaotic.
6. Maintain deployment documentation
Document your deployment process, environment configurations, and incident response procedures. Use Infrastructure as Code tools like Terraform or Ansible to version your server configurations alongside your application code. New team members should be able to deploy a web app by following the documentation alone. If only one person knows how to deploy, your team is one sick day away from a blocked release.
These practices are not optional extras. They are the foundation that separates teams shipping with control from teams shipping with crossed fingers.
How Space-O Technologies Helps You Deploy Web Applications That Scale
Since 2010, Space-O Technologies has delivered 300+ custom software solutions for 1,200+ clients across healthcare, finance, retail, logistics, and enterprise SaaS. If you’re looking to hire web app developers, our team works across the full deployment stack using React, Vue.js, Node.js, and Laravel, with cloud infrastructure on AWS and Azure. We set up CI/CD pipelines, implement DevOps workflows, and follow cloud-native practices so your application deploys with zero downtime and scales on demand.
Every deployment includes built-in security and compliance covering HIPAA, GDPR, and PCI DSS standards, along with HTTPS configuration, access control, and encrypted data handling. For enterprise clients, we have delivered 30+ enterprise-grade web applications with role-based access control, multi-tenant architecture, and secure API integrations.
With a 97% client retention rate, our engagement goes beyond launch. We provide ongoing maintenance, performance optimization, security updates, and scaling support through Agile sprint cycles with full transparency. Whether you are deploying an MVP or scaling an enterprise platform across regions, Space-O Technologies manages the entire deployment lifecycle from architecture to production.
Frequently Asked Questions About Web App Deployment
How much does web app deployment cost on different cloud platforms (AWS, Azure, GCP, Vercel, Netlify)?
Web app deployment costs range from $0 to $5,000, depending on platform and traffic. AWS EC2 plans start at around $5 per month, Azure App Service starts near $13 per month, and Google Cloud Run uses a pay-per-request model. Vercel and Netlify both offer free tiers, while paid plans typically start at $19 to $20 per month. The total web app development cost also depends on add-ons like databases, storage, CDN usage, and SSL certificates.
What is the difference between web app deployment and web hosting?
Web hosting provides the server space where your application files live, while web app deployment is the process of getting those files onto the server and making them operational. Hosting is a static resource. Deployment is an active workflow. You purchase hosting once, but you deploy every time you release an update. Deployment includes building, testing, configuring, and launching your application. Hosting simply provides the infrastructure where the deployed application runs.
How do I choose between Docker containers and traditional hosting for web app deployment?
Choose Docker when you need consistent environments across development, staging, and production. It also helps when your application uses a microservices architecture. Traditional hosting works well for simple apps with a single backend and predictable traffic. Docker adds value when multiple team members deploy frequently, and environment parity is critical. If your team lacks container experience, the learning curve can slow initial progress. Start with traditional hosting for simple projects and adopt Docker as complexity grows.
What is the safest deployment strategy for production apps with zero downtime?
Blue-green deployment is the safest strategy for zero-downtime releases. It provides instant rollback by switching traffic between two identical environments. Rolling deployment also achieves zero downtime by updating instances one at a time. Canary deployment limits risk by exposing only a small percentage of users to the new version first. The safest choice depends on your infrastructure budget, application architecture, and rollback speed requirements. Space-O Technologies recommends blue-green deployment for mission-critical applications.
How long does it take to deploy a web application?
A simple web application with CI/CD automation deploys in 2 to 10 minutes from code push to live. First-time deployments take longer because they include server setup, DNS configuration, SSL installation, and database provisioning. This initial setup can take a few hours to several days, depending on complexity. Subsequent deployments are much faster because the infrastructure is already in place. Manual deployments without automation typically take 30 minutes to several hours.
Can I deploy a web app without a DevOps team?
Yes, PaaS platforms like Heroku, Render, Vercel, and Netlify let developers deploy without DevOps expertise. These platforms handle server provisioning, scaling, SSL, and CI/CD automatically. You push code to a Git repository, and the platform deploys it. For more complex applications requiring custom infrastructure, cloud providers like AWS offer managed services that reduce (but do not eliminate) the need for DevOps knowledge. Space-O Technologies provides full deployment support for businesses that want expert-managed infrastructure without building an in-house DevOps team.
What happens if a web app deployment fails in production?
A failed production deployment triggers your rollback plan, reverting to the last stable version. Blue-green deployments roll back instantly by redirecting traffic. Rolling deployments stop the update and leave the remaining instances on the previous version. Without a rollback plan, a failed deployment can cause extended downtime, data corruption, or security exposure. The key is to detect failures fast through monitoring and health checks, and to have a tested rollback path ready before every deployment.
Do I need a WAF (Web Application Firewall) for web app deployment?
A WAF is strongly recommended for any production app that handles user data or financial transactions. A WAF filters and monitors HTTP traffic between users and your application. It blocks common attacks like SQL injection, cross-site scripting (XSS), and DDoS attempts before they reach your server, providing essential DDoS protection for production applications. Cloud providers offer managed WAF services (AWS WAF, Azure Front Door, Cloudflare WAF) that require minimal configuration. For applications that process sensitive data, a WAF is not optional. It is a baseline security requirement.
What are the common reasons a web app deployment fails?
The most common deployment failures stem from missing environment variables and untested database migrations. Dependency conflicts and insufficient server resources also cause frequent issues. Other frequent causes include expired SSL certificates, incorrect DNS configurations, and incompatible API versions between frontend and backend. Most of these failures are preventable through a pre-deployment checklist, automated testing, and staging environment validation. Building a culture of deployment discipline eliminates the majority of these issues before they reach production.



 All our projects are secured by NDA




 4.8
4.8